


The John Holmes CL Valiant Pornovan Project
Page 4 of 8 •  1, 2, 3, 4, 5, 6, 7, 8
 ![]()
Re: The John Holmes CL Valiant Pornovan Project
![]() by vanner065 14/3/2010, 12:07 pm
by vanner065 14/3/2010, 12:07 pm

vanner065- Admin
- Posts : 1603
Join date : 2008-08-13
Re: The John Holmes CL Valiant Pornovan Project
![]() by mazdragon 15/3/2010, 4:41 am
by mazdragon 15/3/2010, 4:41 am

mazdragon- Posts : 1973
Join date : 2008-08-14
Location : somewhere on the planet in my den
bubble window
![]() by ford351 15/3/2010, 6:40 am
by ford351 15/3/2010, 6:40 am

ford351- Posts : 20
Join date : 2009-05-01
Age : 53
Location : welby
Re: The John Holmes CL Valiant Pornovan Project
![]() by Guest 15/3/2010, 9:09 am
by Guest 15/3/2010, 9:09 am
Simo
Guest- Guest
Re: The John Holmes CL Valiant Pornovan Project
![]() by Guest 21/3/2010, 12:04 pm
by Guest 21/3/2010, 12:04 pm

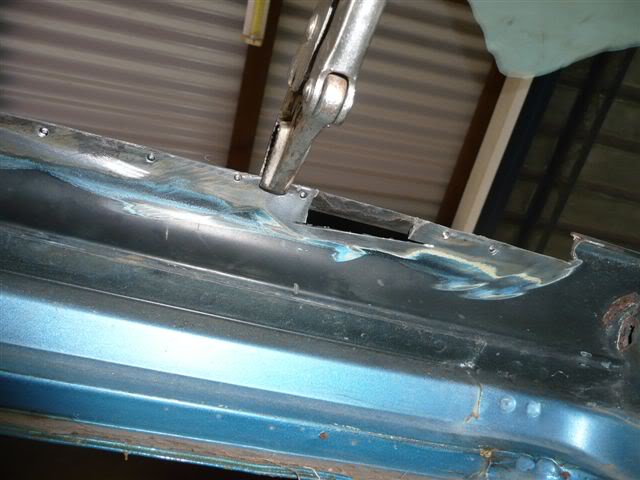
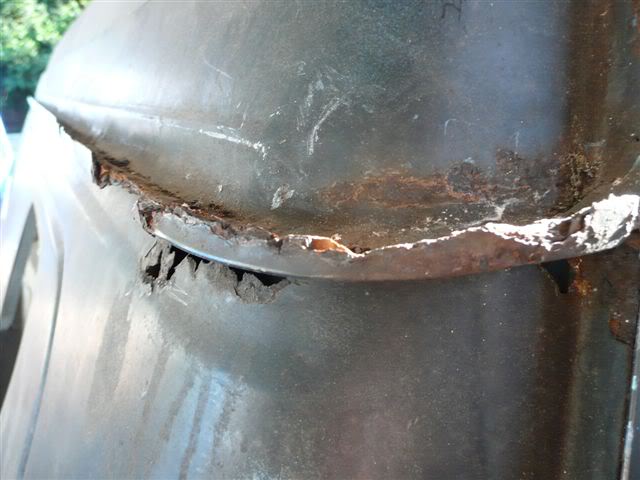
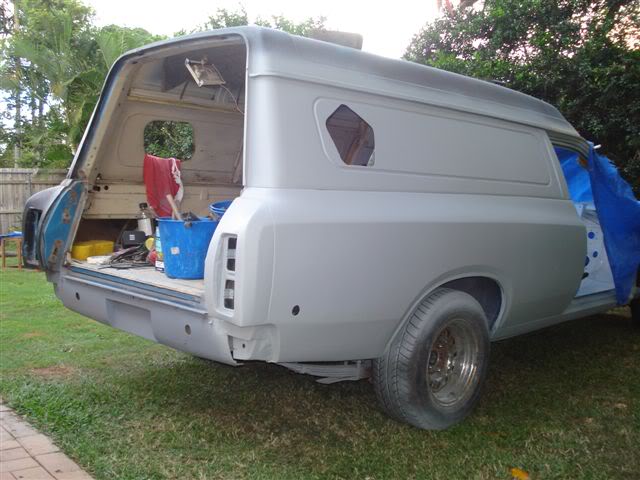
But I did get stuck into the gutter rails which were pretty badly rusted in a couple of spots. Its one of those jobs that I've never done before and have been circling for the last few months, but now that most of the other bodywork is done, I really didn't have much choice. We rolled the van out and turned it around (much to the amusement of the neighbours) so I really need to get the open side painted up to seal it. As always though, the shit you fear is usually pretty easy and I'm actually getting them done with a minimum of fuss!
So I started with the easier left side as a practice run, as you can see its pretty crusty, with the whole front outer lip pretty much eaten away:

I grabbed a donor rail that I saved from an old Hardtop shell I used to have (but reversed to fit better) and cut out the rusty area:

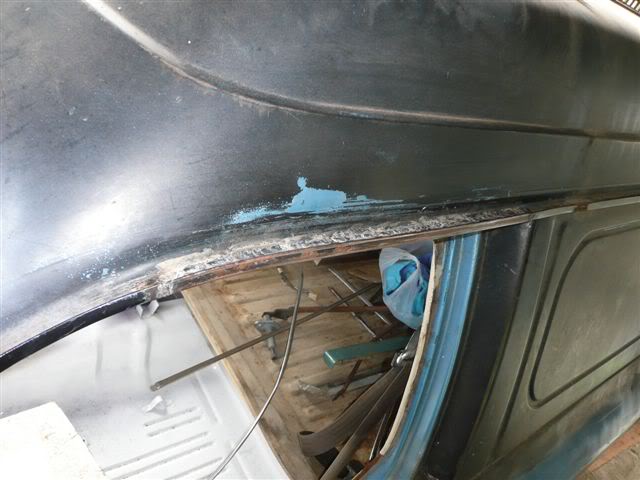
It had some extra rust underneath that I cut out and plated, and I plug welded all of the panels that form the original seam to keep it together:

Then the donor gutter was cut at a matching curve for the A pillar and shaped to fit. Then it was tacked the final welded in:
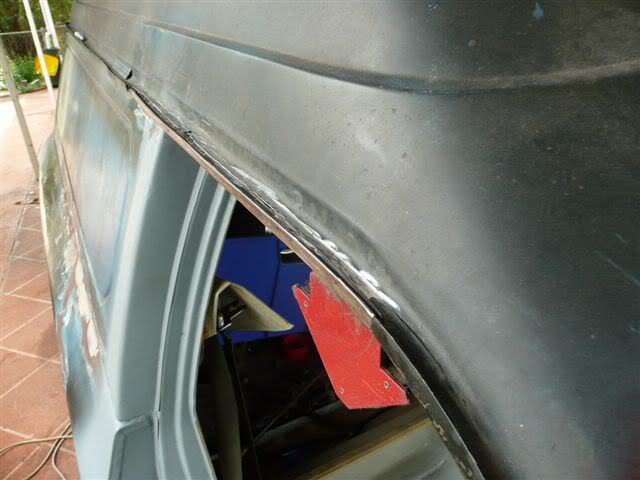
All cleaned up and its done, with a final smoothing to be done with normal body prep:


It all went well except for when a hot molten ball of weld metal flicked through a refugee hole in the front of my jeans, burnt through my Reg Grundy's and onto my old fella! Fark it hurt and I was running around the backyard trying to rip my pants off, so the neighbours think I'm more mental than normal... Now my knob's got a Marilyn Monroe-esque beauty spot sitting right above and off to the side of the eye...
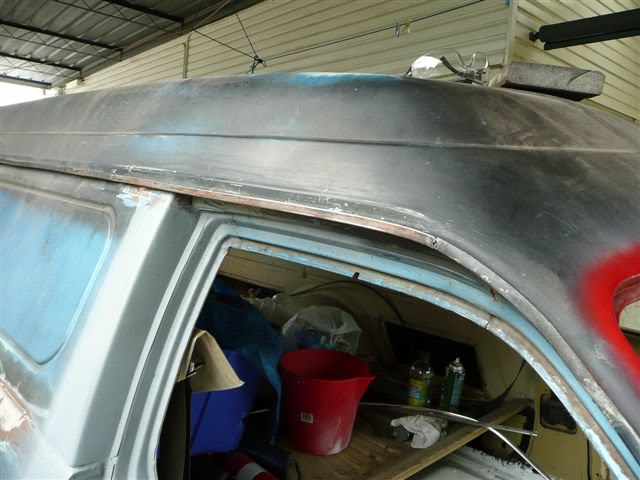
It didn't ruin me enough to not start today on the right side which was pretty bad, the rusted section was a good 600mm long.

but after yesterday's effort it all went pretty smooth..
Hopefully I get that side all sorted next weekend and then I can do a couple of small sections here and there.
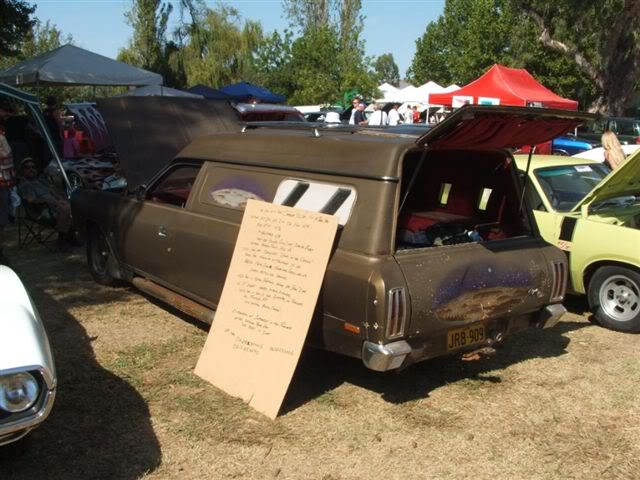
I'm gonna cheat though and fit a chrome trim all the way along using parts from a CL sedan and wagon; Pano's don't usually have it fitted but it looks heaps better, as per this old show refugee thats had something similar fitted at some stage:


have fun
Simo
Guest- Guest
Re: The John Holmes CL Valiant Pornovan Project
![]() by Guest 21/3/2010, 12:15 pm
by Guest 21/3/2010, 12:15 pm
Guest- Guest
Re: The John Holmes CL Valiant Pornovan Project
![]() by Guest 21/3/2010, 12:22 pm
by Guest 21/3/2010, 12:22 pm
hemi4bbl wrote:
It all went well except for when a hot molten ball of weld metal flicked through a refugee hole in the front of my jeans, burnt through my Reg Grundy's and onto my old fella! Fark it hurt and I was running around the backyard trying to rip my pants off, so the neighbours think I'm more mental than normal... Now my knob's got a Marilyn Monroe-esque beauty spot sitting right above and off to the side of the eye...Simo
At least with that part out of action, more work will be done on the van.
Guest- Guest
Re: The John Holmes CL Valiant Pornovan Project
![]() by Guest 29/3/2010, 9:31 am
by Guest 29/3/2010, 9:31 am
Well, I managed to get sweet F A done this week on the old girl, made harder by the fact I spent the week working in Cairns! But it was the perfect time to do some research and concepts to get a few things sorted and decisions made, and keep it moving for the Christmas deadline.
A strange turn of events has also seen a shiteload of interest and requests for bubble stuff; from the forums, email group and friends of friends for all sorts of tailgate and side windows, and tailamp covers so I've decided to pump out some Holden and Ford gear soon. What started out as a pair of bubble tailight lenses for a mates drag VG Hardtop, and of course the dare from another mate to make a clear bubble diff cover for the Van looks to be growing into a fair bit more, but really I shouldn't be surprised by the interest after finding out how hard it was to get someone even remotely interested in making my stuff in the first place.
I managed to squeeze out a couple of hours today by finishing up the right gutter rail and doing a couple more short sections that needed attention:

After I get the right side fully prepped and in paint then I'll get stuck into 'hell corner'... No, its not too bad and no worse than the right side was originally - it might just take a bit more shaping for the bit that goes around the corner.

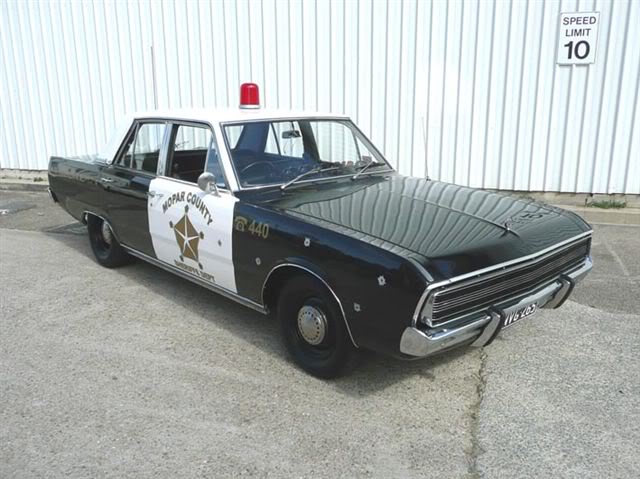
Part of my brainstorming this week was how to do a MacGyver and turn all this dodgy refugee fibreglass and spare CL nosecone into a bolt-on Trans Am front:
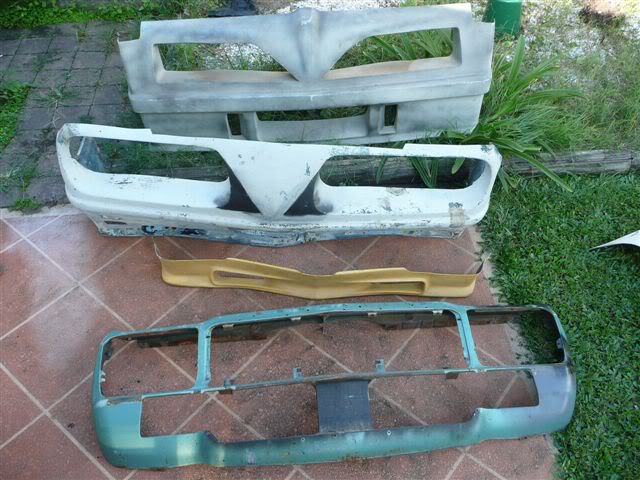
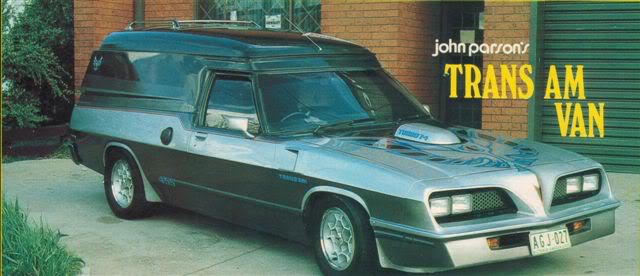
The fibreglass nosecones are both disgustingly ugly (even for a porno front freak like myself) and the allegedly LC/LJ front spoiler (looks a bit narrow) will be chopped up to help make a lower pan. The front I'm going for is exactly like the one below which is by far the best looking and most accurate front ever made; I always loved this Q-ey Van of John Parsons who actually used to make them under the J&G banner, but mine will have black tinted covers over the headlamps. Making the front sounds like a good excuse for another BBQ anyway...

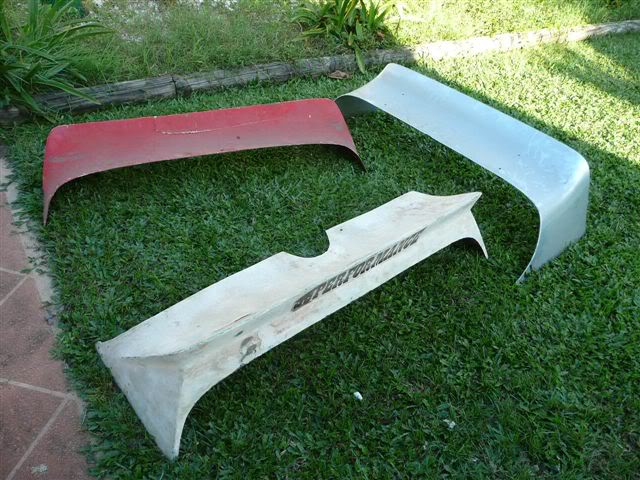
However, next on the agenda is making a roof spoiler. here's a few Holden and Falcon ones I've collected from swaps and ebay which I'll morph onto the Valiant roof. It'll mainly be based around the white one from a HT Holden pano, so I'll study the 'net and try fibreglassing with that before attempting to make a Trans Am front (it'll probably end up looking like a surfboard going by what's on the internet though..).
have fun
Simo
Guest- Guest
Re: The John Holmes CL Valiant Pornovan Project
![]() by Guest 5/4/2010, 10:49 pm
by Guest 5/4/2010, 10:49 pm
I've found a secret ingredient to getting heaps of work done - a strict diet of Coke and Easter Eggs. Worked a treat and I managed to get a fair bit done on Sunday and Monday. After enjoying a great Easter spread (and the food was good as well) about twenty layers of paint on the right side was scuffed back, mostly bare metalled, prepped, etched and hi-filled. The right seam (where the van top joins what would normally be the top of ute sides) was a total dogs breakfast, with hammer marks, dents, rust holes and bad tack welding that had actually filled parts of the seam. I manged to tap it out, weld the holes up and create a new seam with a grinder and hacksaw blades, and skim it all off to get it looking half decent again, which was all a bit tedious but is now done.
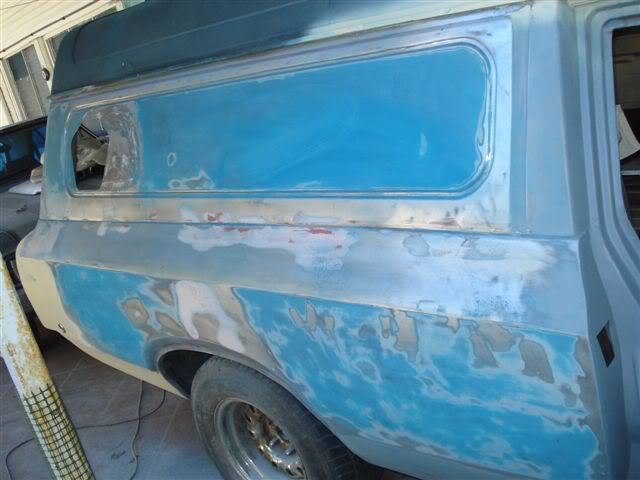
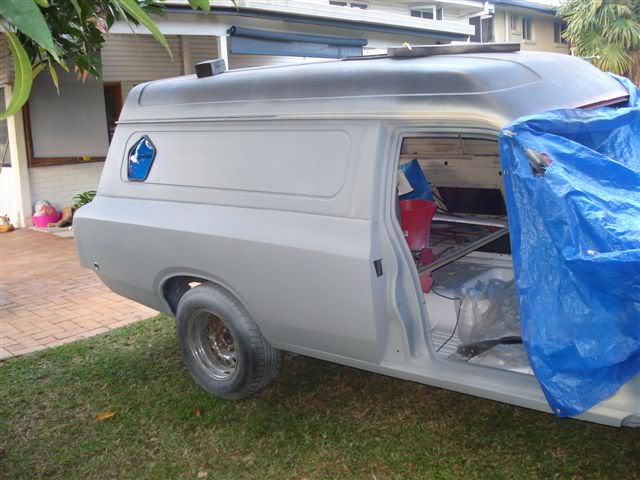
But along the way I got to do some fun stuff, like fit the new side window. This is one of the windows from the Bubble-O-Bill day and I trimmed up the acrylic on a mini bandsaw and cut some rubber to length, then tried it in a few spots and stared at it like Forrest Gump to make sure it ended up in the right spot. But here's the side with the old parralelogram window hole I metalbonded with fresh metal a few weeks ago:

Then the window was dummied into the right position and marked out; I need it pretty far back to leave room for the signwriting:

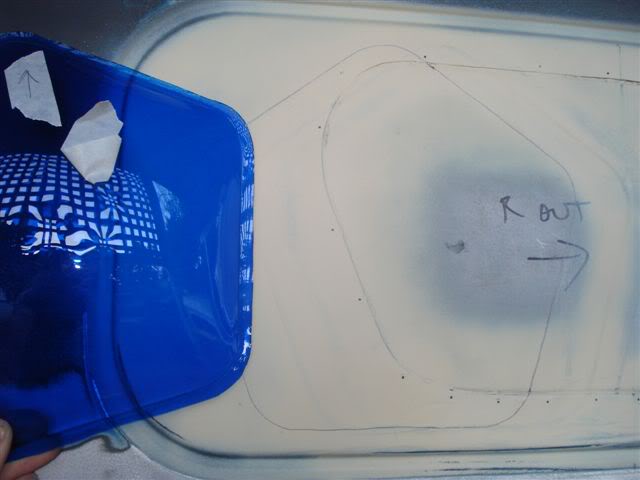
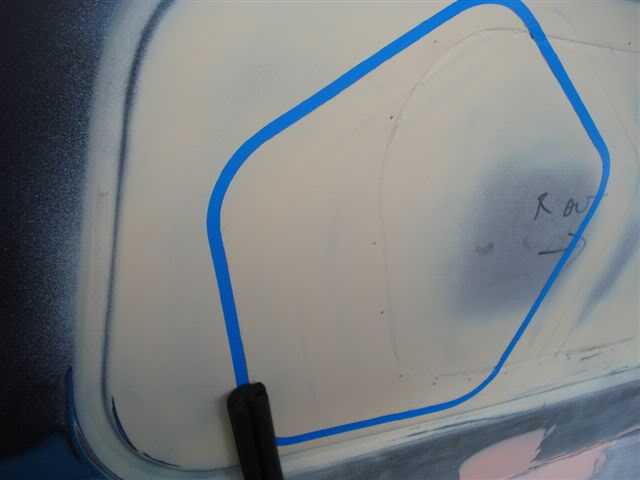
The shape was then traced in 6mm pinstripe tape to make a new cut line that allows for the centre part of the rubber, then jigsawed out:


Then it was back to prepping which included the final smoothing of the old window plug, I managed to chop back out about a 1/3 of it fitting the pentagon window which saved some work:
Fark its good to see the Van in a different spot for a change, out onto the back lawn for a dust-off, and you can see the original Stellar Blue thats been hiding under the flat black for years; its an awesome colour and my Mum had a Charger in that shade when I was a kid, I even painted my BMX Stellar Blue in the 80's too! It's tempting to paint it that colour again...

even the bad side looks better when you can stand back a bit:

Then with the prep done it was on with some etch primer:
While I was waiting for that to dry I got stuck into the bubble tailamp covers. They start as a pretty big-ish sheet of which most ends up as scrap, but that's the price you pay to get the double curves right:
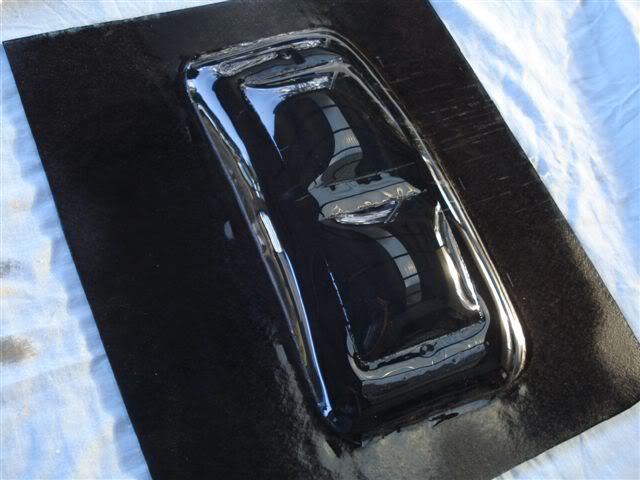
All trimmed up (yes, I'll replace the broken lense for rego...). They sit neatly into the chrome surround which I'll also de-black for final fitment.

Then it was on with the hi-fill primer putty stuff (same colour as the etch which was a bit boring) and after a good sunbake I did another test fit on the window and jammed in the bubbled tailamp:


One side down, one to go..
have fun
Simo
Guest- Guest
Re: The John Holmes CL Valiant Pornovan Project
![]() by Ramble 6/4/2010, 9:53 am
by Ramble 6/4/2010, 9:53 am

Ramble- Posts : 566
Join date : 2009-02-23
Location : mid nth coast nsw
bubble bits
![]() by Mans Ruin 6/4/2010, 5:21 pm
by Mans Ruin 6/4/2010, 5:21 pm
the bubble window and lenses look sweet, cant wait to get mine lol. great work mate!! cant wait to see it done!
good luck!!
rick.

Mans Ruin- Posts : 59
Join date : 2010-01-31
Age : 37
Location : Bendigo, Victoria
Re: The John Holmes CL Valiant Pornovan Project
![]() by Guest 7/4/2010, 10:37 am
by Guest 7/4/2010, 10:37 am
Great work mate.
Guest- Guest
Re: The John Holmes CL Valiant Pornovan Project
![]() by Guest 7/4/2010, 10:54 am
by Guest 7/4/2010, 10:54 am
The interior (front) is sorted, the front end's rebuilt and ready to bolt in, the engine is machined and ready for reassembly with all parts standing by, the diff is in the same boat and there are a swag of new brake parts waiting patiently so I think it'll come together quite quickly and within the $5000 budget I'm aiming at.
Finished and rego'd by Christmas is the plan, although I reserve the right to rego it before the rear is decked out! Only then will I be able to truly call it 'finished'!
have fun
Simo
Guest- Guest
Re: The John Holmes CL Valiant Pornovan Project
![]() by Guest 7/4/2010, 11:08 am
by Guest 7/4/2010, 11:08 am
Guest- Guest
Re: The John Holmes CL Valiant Pornovan Project
![]() by Guest 12/4/2010, 1:06 pm
by Guest 12/4/2010, 1:06 pm
I guide coated the right side, dry blocked it and it came up pretty darn smooth except for a couple of low spots where it had the big vertical ding between the rear wheelarch and the tailamp; I'll get them smoothed up and hopefully reprimed for a final rub back by next weekend. I didn't even look at the roof which was a bummer as I really need to get the moon roof hole sorted asafp.
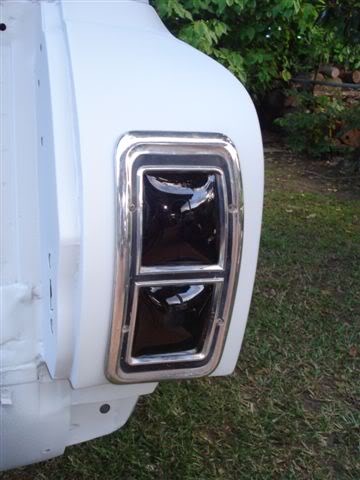
So in the meantime I focused on the getting the tailamps sorted once and for all, bagged and put away for final assembly. The tinted covers can prove a problem as far as actually having your lamps visible (who'd have thought?), but we all know with cars that function follows form! Thankfully the VK Holden Calais set a nice precedent as far as legality and ADR's go with tinted tailamp lenses, and those things glow like a black candle on a good day. A couple of years back I built the VG Cop Sedan and replaced the gumby VG sedan tailamps with heavily tinted and modded VF-VG VIP assemblies and bootlid garnish and it looked pretty tough! It took a few goes to get the lamps shining nice and bright, but at least this time round I knew what formula was going work straight up:


Should have kept that car and sold my wagon instead, it was the best and tightest driving Valiant I've ever steered and it wasn't due to anything magical on my part, it was all sweet underneath when I bought it.
So now I've turned out of memory lane, making them shine bright for the van took about an hour or so and $10. First up was to line the bulb holder buckets with chrome signwriters vinyl, then do the same thing to the inner side surfaces of all of the lenses. The back of the reflectors also had to be done to make sure they bling up ok as they are supposed to reflect without any local light source. Top is stock, bottom is stickered obviously for comparisons sake. Even on standard lamps this is a great trick to do.

So with that done it was time to linish up the bubble pieces and gel glue them to the lenses; a bead of silastic was then run around the edges to make them watertight, the last thing I want is for water to get in between the bubble pieces and lenses and make it look like a fish bowl. Or do I.... No no, get the fishbowl tailamp idea out of my head, too much imagination hey Linton! I paint stripped the black out of the chrome surrounds and gave them a polish, and then threw in a set of brighter bulbs (1.5's or whatever they're called) instead of the standard ones which will also help to jazz it up a bit.

Hoodlum Jim is now the proud owner of the Turquoise VG safari I bought and pictured here a while back, I've already got enough on my plate and geez he's not farkin' about to get it built; it's being done as a surfin safari patina wagon with plenty of bamboo and tiki's so will be super cool once its on the road.


have fun
Simo
Guest- Guest
Re: The John Holmes CL Valiant Pornovan Project
![]() by highwaymenace 12/4/2010, 1:30 pm
by highwaymenace 12/4/2010, 1:30 pm

highwaymenace- Posts : 1912
Join date : 2008-08-13
Location : Geelong -

Re: The John Holmes CL Valiant Pornovan Project
![]() by Guest 12/4/2010, 10:34 pm
by Guest 12/4/2010, 10:34 pm
Guest- Guest
top job.........
![]() by Mans Ruin 13/4/2010, 4:43 pm
by Mans Ruin 13/4/2010, 4:43 pm
speakin of which have you had a chance to do any holden covers!! either way sweet as job !!!!!
Mans Ruin- Posts : 59
Join date : 2010-01-31
Age : 37
Location : Bendigo, Victoria
Re: The John Holmes CL Valiant Pornovan Project
![]() by Guest 16/4/2010, 1:03 pm
by Guest 16/4/2010, 1:03 pm
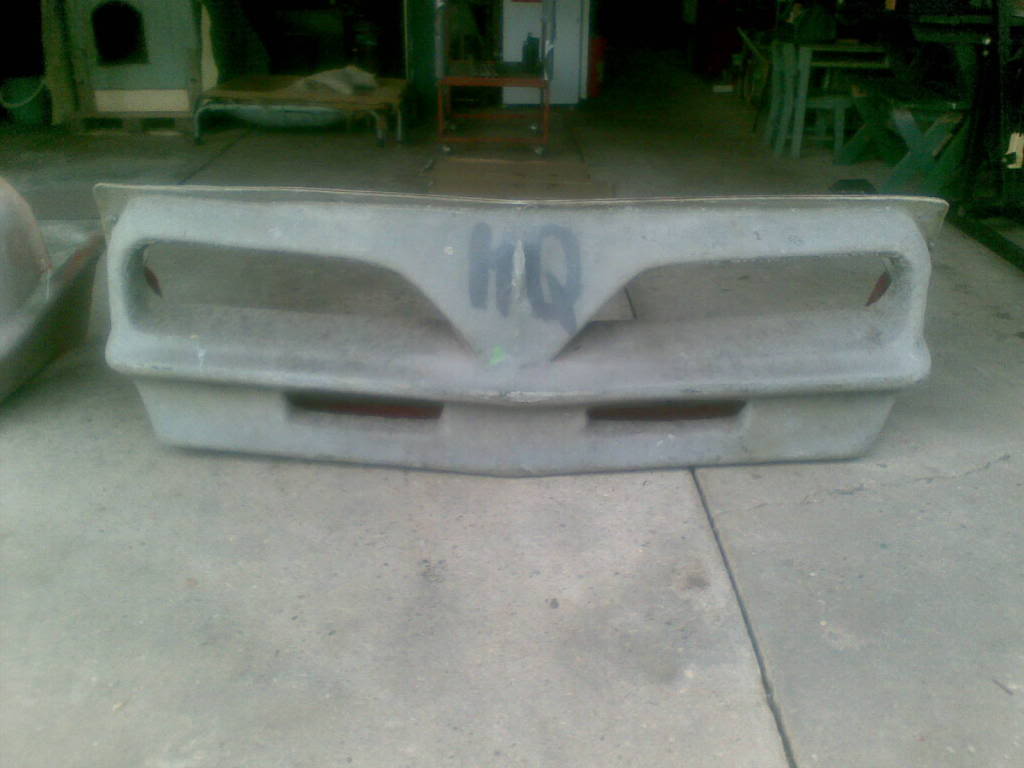
With a massive thanks to a mate Scotty who collected this for me, my life is now complete. That's right, a genuine J&G Automotive Trans Am front!
Another mate is building a Midnite Spares 1 tonner tow truck (well I've 80% conned him into it) so once a mould is done she'll be morphed onto a CL nosecone for the Disturbia project.
Yeehah!
Simo


Guest- Guest
Re: The John Holmes CL Valiant Pornovan Project
![]() by highwaymenace 16/4/2010, 3:23 pm
by highwaymenace 16/4/2010, 3:23 pm
highwaymenace- Posts : 1912
Join date : 2008-08-13
Location : Geelong -
Re: The John Holmes CL Valiant Pornovan Project
![]() by Crackers 17/4/2010, 12:11 am
by Crackers 17/4/2010, 12:11 am

Crackers- Posts : 102
Join date : 2008-12-21
Age : 54
Location : Beaconsfield (VIC) -
Re: The John Holmes CL Valiant Pornovan Project
![]() by Ramble 17/4/2010, 1:50 am
by Ramble 17/4/2010, 1:50 am


Just joking, your vans gunna be one that really stands out..nice going
Ramble- Posts : 566
Join date : 2009-02-23
Location : mid nth coast nsw
Re: The John Holmes CL Valiant Pornovan Project
![]() by Rusty62TransAm 19/4/2010, 5:36 am
by Rusty62TransAm 19/4/2010, 5:36 am
If anyone is interested in a Nose Cone, send me a PM.
Regards
Rusty!

Rusty62TransAm- Posts : 191
Join date : 2008-09-18
Age : 61
Location : www.majesticvanners.com -
Re: The John Holmes CL Valiant Pornovan Project
![]() by alien8 20/4/2010, 8:22 am
by alien8 20/4/2010, 8:22 am

alien8- Posts : 681
Join date : 2008-08-14
Location : East Coast Vaner Brisbane
Re: The John Holmes CL Valiant Pornovan Project
![]() by Rusty62TransAm 20/4/2010, 11:48 am
by Rusty62TransAm 20/4/2010, 11:48 am
alien8 wrote:Hi Rusty.,is this the one that you had at easter or the one you have done yourselfas its come up a treat
Gidday Kath
It's the one of the ones I already had at Easter.
I'm working on the Monza Front.
Big Hugs back to you and Julian.
regards
Rusty!
Rusty62TransAm- Posts : 191
Join date : 2008-09-18
Age : 61
Location : www.majesticvanners.com -
Page 4 of 8 • 1, 2, 3, 4, 5, 6, 7, 8 ![]()
» New member
» My xy van project
» MY NEW WB PROJECT
» Holden vans with John Goss style roof spoilers
» Squaw in the modern age of Vanning
» Fire Truck roof spoiler
» CAR SHOW AT BOWRAL NSW
» A van only magazine needed? Are you interested?
» October 19th
» Fathers Day Hot Rod Show 2014
» hsv front to a HJ
» REGO PLATES