


The John Holmes CL Valiant Pornovan Project
Page 5 of 8 •  1, 2, 3, 4, 5, 6, 7, 8
 ![]()
Re: The John Holmes CL Valiant Pornovan Project
![]() by Guest 20/4/2010, 2:54 pm
by Guest 20/4/2010, 2:54 pm
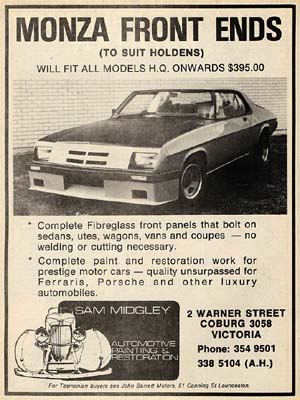
Rusty62TransAm wrote:I'm working on the Monza Front.
Look forward to seeing the pics when finished Rusty.
Guest- Guest
Re: The John Holmes CL Valiant Pornovan Project
![]() by Guest 27/4/2010, 11:45 am
by Guest 27/4/2010, 11:45 am
Speaking of balls, I got off to a slow start after snapping my bandsaw blade chock-a-block in the sack and between the nads of a CnB bubble window. I was cutting it out to send to Guruver Gus in Adelaide, so hang in there, I promise it'll be there soon! The guy at Bunnings wasn't quite expecting that as the answer when he asked me how I snapped a near-new blade..
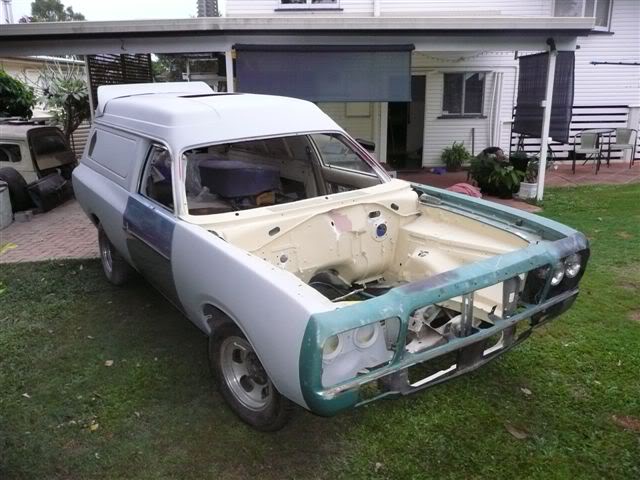
Sooooo I plodded along with the resmoothing of a couple of bits on the rear 1/4, I'm probably being a bit pedantic with it but seeing its being panelled and painted on the backlawn I'd rather peoples responses be "no shit?" than "I can tell" once its out doing the rounds. To that end I resmoothed and hi-filled sections, re long boarded since the shot below, and now its all sorted for primer.

Over the last couple of weeks I've managed to source a swag of VH-CM Station Wagon gutter chrome trim which will find its way onto the van as well:

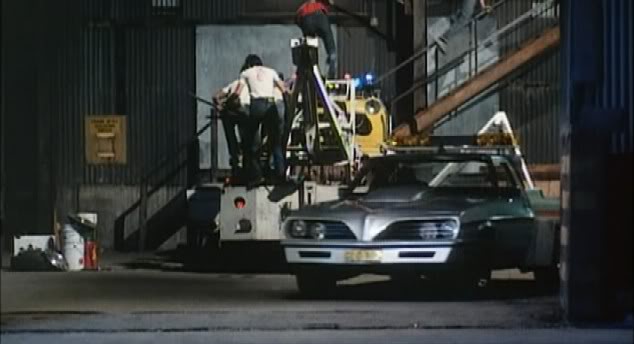
This arvo I decided to so a mock-up the new Trans Am front and the first shot straight away reminded me of a Midnite Spares Tow truck:

But of course there's no way in hell I'll be able to smash it off on gutters in high stock guise, so the plan is to mount a lower spoiler that sits further back to help the design flow, and also fill out the front a bit more. Here's some mock-ups using a CL air dam spoiler which I'll use as a template to make my own glass version using an LJ Torana front air dam as a donor:


The front came with chopped down XB Falcon grilles which I'll keep but blacken out, and I'll run some black perspex over the headlights in its final form. You'd think I'd have some spare tinted perspex to mock in there instead of cardboard, but funnily enough there's no flat stuff left as all the bubble window scraps resemble C'nB's now..
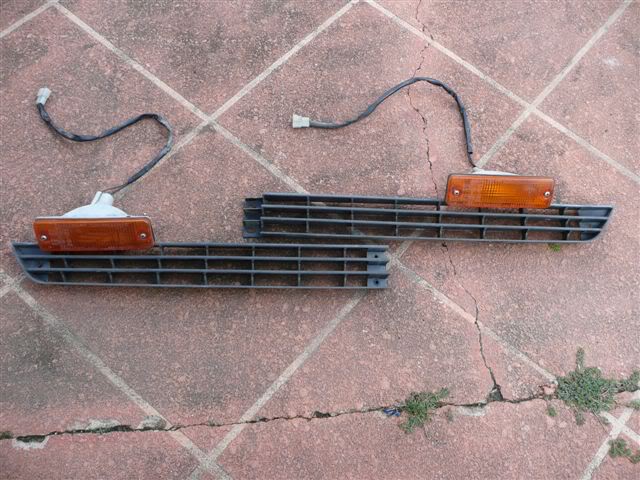
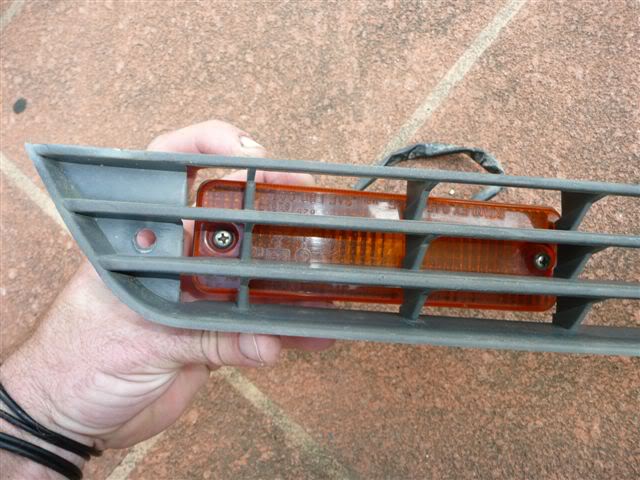
The Sigma vents and Mazda 626 indicators are a damn near perfect fit with only minimal mods required and I'll fill the LH-X Torana indicator holes and run the new indicators behind these grilles.
The number plate will have to go lower than normally fitted too I think, and its about this time that I'm wishing I'd bought a slimline plate for the front..
If you blur your eyes a bit, it'll start to make sense!
A towie mate made the suggestion of running tow points behind the Sigma grilles in the event that it ever needs to be winched or towed; I'll be mounting pipe/plate behind on the stock bumper irons to replace the normal bumper bar for rego, so will add threaded points to these which can have eyelets wound in should it ever need it. The lower spoiler will also be removable too, should clearance or repairs ever be needed.
So at the moment the Van's sort of reminding me of one of my favourite ever 'in the build' shots of "Lady Ice" from an old Custom Vans & Trucks mag, and I have to say you'd need a big pair of kahuna's to roof chop a panelvan!

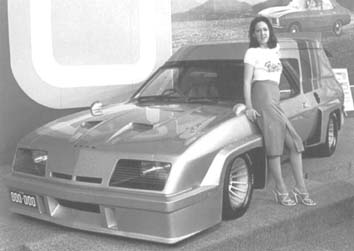
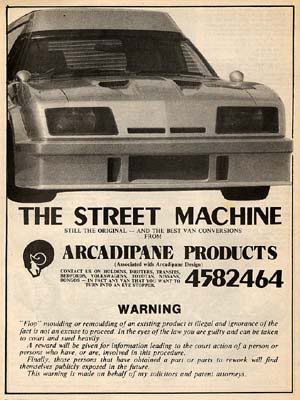
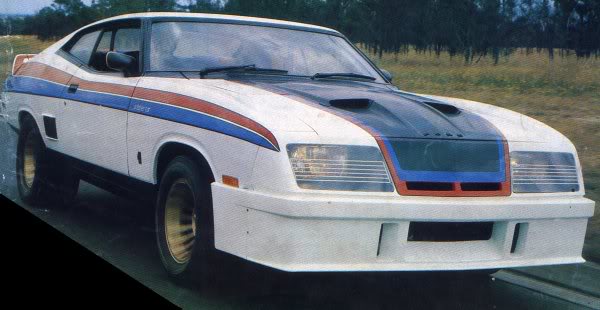
Lastly, I often get asked why I like this whole era and styling cues, and I have to say that its pretty much from being a starry eyed kid seeing ads and pictures like these classics below:
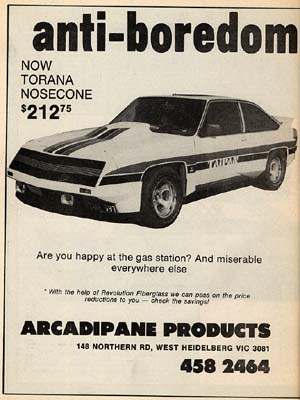
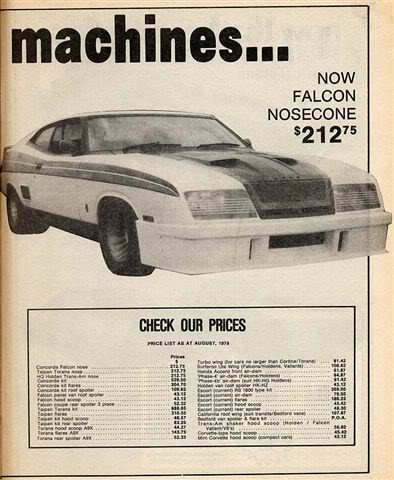
have fun
Simo
Guest- Guest
Re: The John Holmes CL Valiant Pornovan Project
![]() by Rusty62TransAm 27/4/2010, 11:54 am
by Rusty62TransAm 27/4/2010, 11:54 am
I must say that I'm loving your latest addition, but then I might be biased.
regards
Rusty!

Rusty62TransAm- Posts : 191
Join date : 2008-09-18
Age : 61
Location : www.majesticvanners.com -

Re: The John Holmes CL Valiant Pornovan Project
![]() by Guest 27/4/2010, 12:16 pm
by Guest 27/4/2010, 12:16 pm
I must say that I'm super impressed and in awe of the effort you're going to to keep the dream alive with the fibreglass fronts, and it has helped to take away any negative thoughts I've had about having to cut my own!
If I come across anything else of interest I'll be sure to let you know
Thanks
Simo
Guest- Guest
Re: The John Holmes CL Valiant Pornovan Project
![]() by CURSED 27/4/2010, 12:20 pm
by CURSED 27/4/2010, 12:20 pm

CURSED- Posts : 238
Join date : 2008-08-15
Location : NSW vanner- mt druitt
Re: The John Holmes CL Valiant Pornovan Project
![]() by Guest 27/4/2010, 12:25 pm
by Guest 27/4/2010, 12:25 pm
Thanks
Simo
Guest- Guest
Re: The John Holmes CL Valiant Pornovan Project
![]() by Rusty62TransAm 28/4/2010, 11:10 am
by Rusty62TransAm 28/4/2010, 11:10 am
hemi4bbl wrote:Thanks Rusty,
I must say that I'm super impressed and in awe of the effort you're going to to keep the dream alive with the fibreglass fronts, and it has helped to take away any negative thoughts I've had about having to cut my own!
If I come across anything else of interest I'll be sure to let you know
Thanks
Simo
Thanks Simo
Got to Keep the Dream Alive!
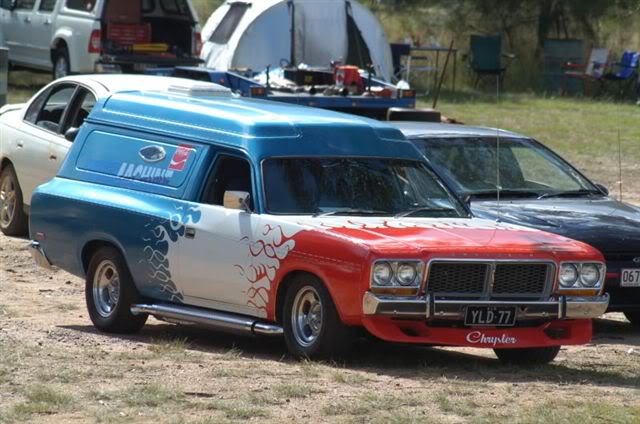
I think it's an 80's thing. I've always loved the the 77-78 TransAm Front on Holdens and I've always been a Chrysler Van Fan. So I think it's a good merge.
I always wanted a TransAm Front on the Wagon. Still do, but I also have something else in mind.
I even owned an 83 Firebird for a while. Sold it to buy a house.

I look forward to hearing from you when you find the odd thing of interest.
It's amazing what is hidden away out there.
Keep up the Good Work!
Regards
Rusty!
Rusty62TransAm- Posts : 191
Join date : 2008-09-18
Age : 61
Location : www.majesticvanners.com -
Re: The John Holmes CL Valiant Pornovan Project
![]() by mazdragon 11/5/2010, 5:27 am
by mazdragon 11/5/2010, 5:27 am
the way you're going... which nationals do you expect it to make its debut?.... i'm already close on 50 (oh shit did i say that??) and I wouldn't mind seeing it finished before i die....

mazdragon- Posts : 1973
Join date : 2008-08-14
Location : somewhere on the planet in my den
Re: The John Holmes CL Valiant Pornovan Project
![]() by Guest 11/5/2010, 6:22 am
by Guest 11/5/2010, 6:22 am
I'm hoping to have it pretty much done by Christmas if my time management goes ok! I've got to deal with Winter and building a fence for the house in the meantime which might slow things down a bit..
And yes it's all been done in the backyard so far! All I project it leaving on a tilt tray for is the headlinings at the trimmers after its painted.
As for the Nationals, hopefully it'll be finished before the next one!
have fun
Simo
Guest- Guest
Re: The John Holmes CL Valiant Pornovan Project
![]() by mazdragon 11/5/2010, 9:15 am
by mazdragon 11/5/2010, 9:15 am
mazdragon- Posts : 1973
Join date : 2008-08-14
Location : somewhere on the planet in my den
Re: The John Holmes CL Valiant Pornovan Project
![]() by Guest 11/5/2010, 12:23 pm
by Guest 11/5/2010, 12:23 pm
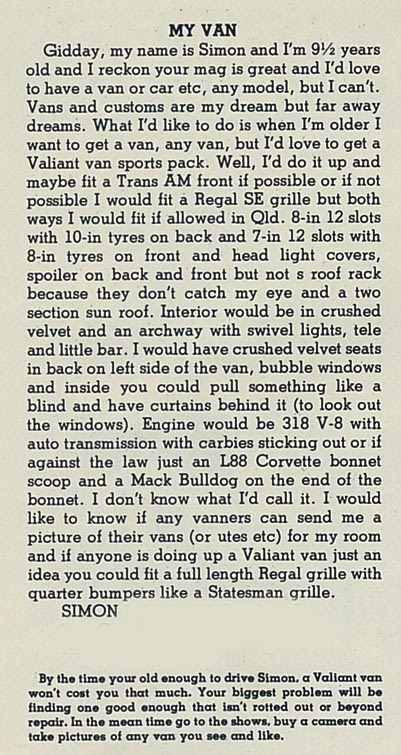
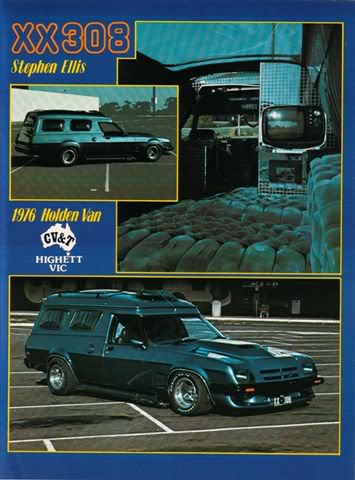
Of course there's a couple of cringeworthy styling cues that will never see their place on the finished product such as the 12 slots and the Mack bulldog on the bonnet (wtf?) but I think its important that most things gets incorporated and recognised in some way. So to that end I've picked up a chromed 12 slotter to use as a spare (aww c'mon its better than nothing!) and a full-size Mack bulldog ashtray that'll find its place in the rear interior somewhere:

The L88 bonnet scoop has been replaced by a reverse cowl Camaro job, I did actually try an L88 scoop on there and it looked terrible so some things have just needed to go! But as far as the rest is concerned it's pretty much on the money - I'm doing both the Trans Am or Regal fronts with headlight covers, I still think roofracks on Vans suck, it's a Sportspack and the interior will still be crushed velvet with swivel lights and an archway, although the TV and Bar won't be going in. I'm going to do some deep diamond buttoning on the sides and rear like XX308 which was the Van interior that inspired my brain for the '83 letter.
and the other thing I've been thinking about too is chroming the whole CL nosecone for the Regal front version like on Shady Lady:

I've managed to pick up another Simon game so I'll mount a pair of these in there and try and wire in some random backlights or use the four colours as interior lights instead.

I've had a couple of queries about the paint and it'll be based on the denimachine like this replica, although these flames look like seaweed (as they did on the originals) and the side signwriting will be a fair bit different too:
Back to the roof!!
Well well well, the friggin' cat was back in fine form this week; you may remember how it wizzed in my twin filter face mask a while back (which I found out about the hard way mind you), well this week it backed out a power-nard right into the palm of my welding glove - thankfully this time I didn't end up with a face full of wee fumes, but was actually able to carefully put the glove on and flick the borry right back at the cat! You're the one who licks your own fur to clean yourself Mofo... But karma came around to bite me in the ass after I ate a heap of Chinese takeaway leftovers, then burped while wearing the well sealing twin filter face mask; not only does it keep the dust out but it seals the fumes in, and I managed to regain consciousness with enough time to actually get some Van work done.
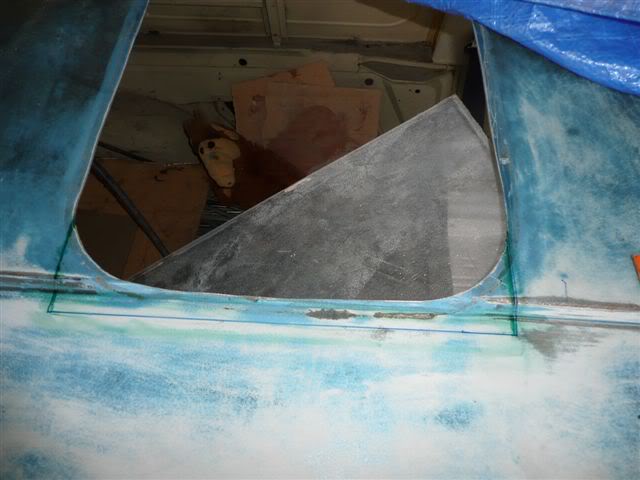
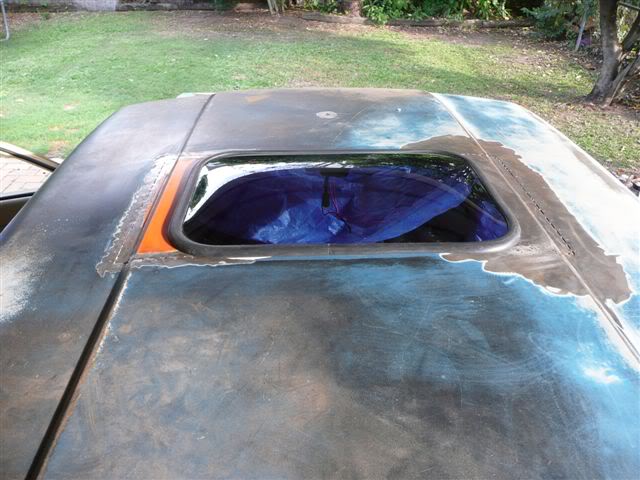
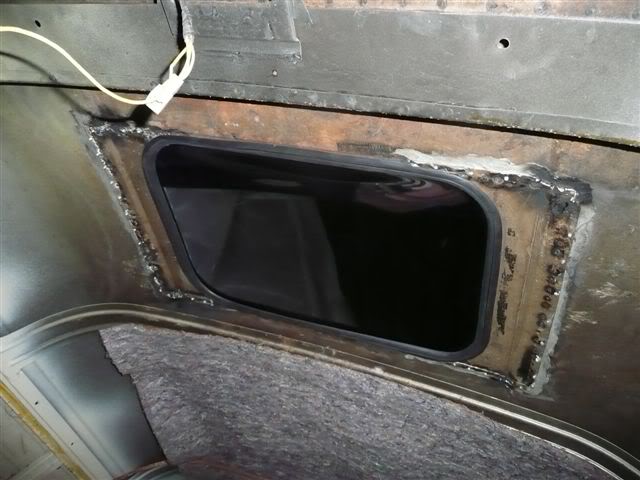
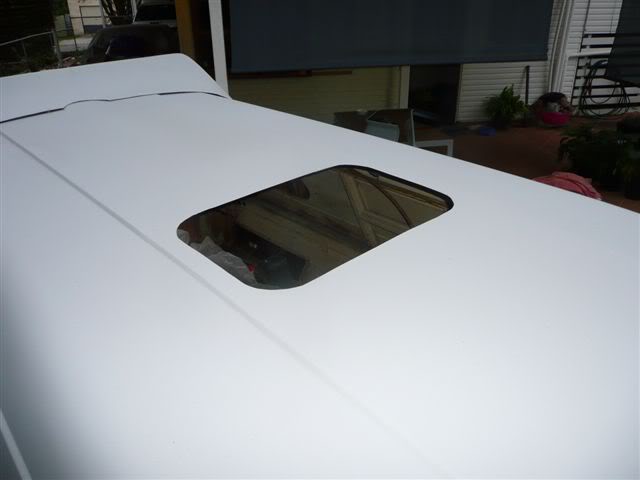
The last couple of weeks have been hampered by the worlds sorest throat and various other distractions but the roof is nearly finished! I set about getting the sunroof hole fixed once and for all. Of course I had pretty much no idea as to the best way to tackle this so went with what I hoped was a logical option. You may remember that the original 70's-era sunroof had been fitted by someone who was obviously tripping on LSD at the time and managed to butcher part of the roof pressings instead of just fitting a smaller sunroof. I started by marking out where I wanted to cut to hopefully keep the actual pressing untouched so any blending or smoothing work could be done on the flat surfaces only:
The donor bits from my friend Chris's super rusty Drifter were then sat in and marked with enough overhang left to recess with the flange tool.
An interesting tidbit of info is the fact that the Drifter roof metal was noticeably thicker than my normal roof metal as in like a comparison of 1.6mm to 1mm thickness; they weren't lying about a steel shortage in the 70's! Same model and built within a year of each other. Maybe I should start a rumour that mine was a special 'Bathurst' panelvan lightened for racing or that Chris's Drifter was a heavy duty option for stunt work...
Anyhoo, I got the right side piece cut, flanged and metalbonded into place, then held with clamps and rivets until it cured:
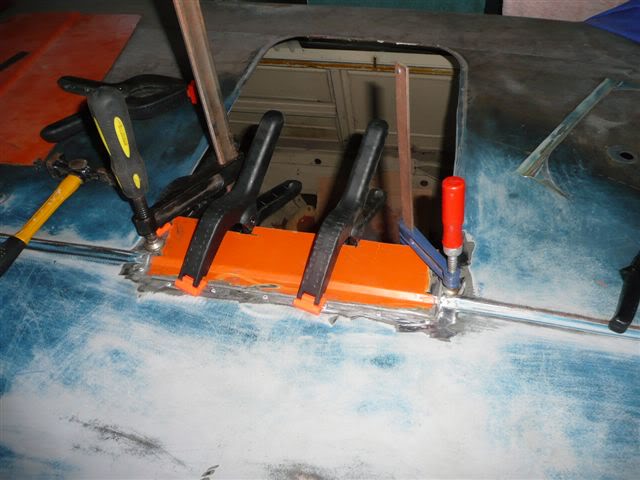
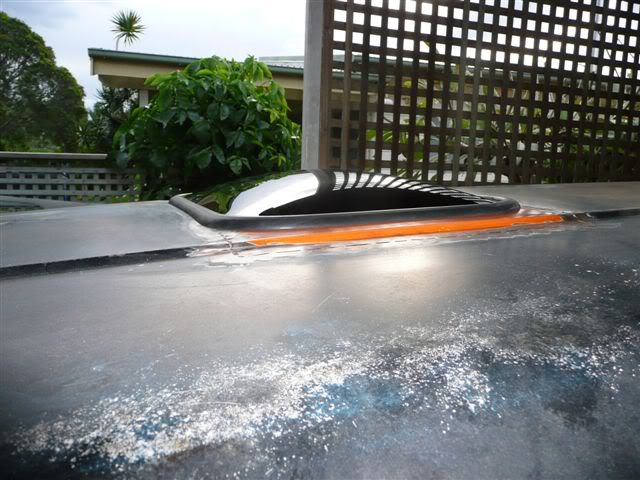
After leaving it clamped for a couple of days I whizzed off the rivets and found that the metalbond gave a bit more than I was hoping for, so me being paranoid I ended up tack welding and cooling the edging just to make sure. Once that was done I did the same to the left side and went and trimmed out the moonroof bubble for the final trace. All the welds were ground back too and the pressing alignment was looking pretty spot-on! While I was up there I also filled an aerial hole that was mounted trucker style about 20cm in front of the sunroof, which I'll replace with one mounted in the middle of the header panel to keep the era correct look.
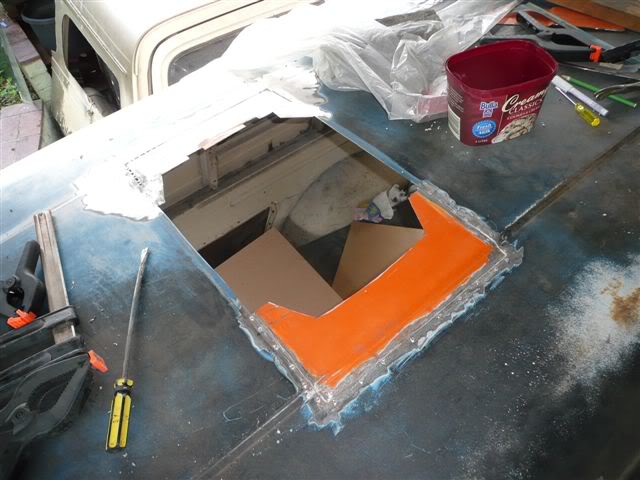
The moonroof bubble acrylic was trimmed to leave a 16mm edge initially which was then traced onto the roof. A further 8mm was then cut off to give the rubber somewhere to go:

The new hole was cut with a jigsaw and the moonroof popped into place. I wanted to try and keep the rubber as smooth as possible so mounted it upside down to have the locking strip on the inside. I'm not 100% sure on whether I'll stick with this window or go with another we made which has less 'bubble', but will wait and see. I don't want it to look like a pimple on the nose of a prom queen, or have you half expect to see a gunner pop out of there like it's a tank. I'll wait and see how 'smooth' it looks once the rear roof spoiler and scooped bonnet are in place.
It was a bit of a mole to fit as I had to do it from the inside and upwards, and it did end up frisbee'd in anger onto the backlawn a couple of times through the windscreen hole when it either dropped on my head or all of the blood rushed from my arms, but at the end of the day I'm happy with it and I'll get in and finish it all off for roof painting. I tell you what though, its a mission to crawl around inside this thing and I'm stuffed if I know how people used to shag in them so often, but I guess there was 'incentive'.. If I ever get lucky in the back of this Van and kick out the moonroof accidentally, it won't be going back in until a have a neck brace to help me look upwards for the time it takes to fit it! It probably would have been easier just to fill the hole altogether, but a panelvan without a sunroof or moonroof is just a workhorse as far as I'm concerned.
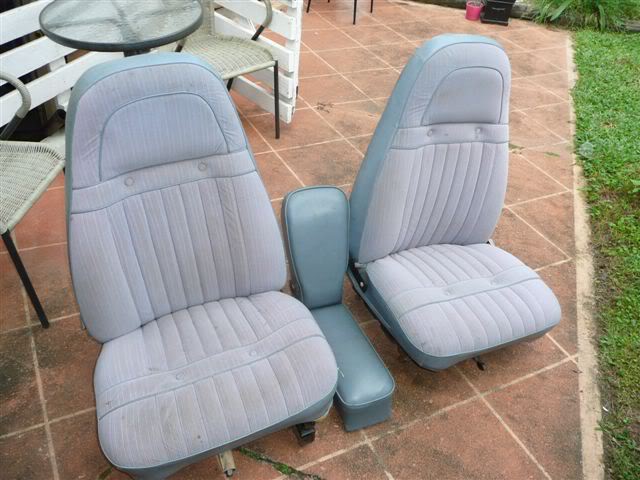
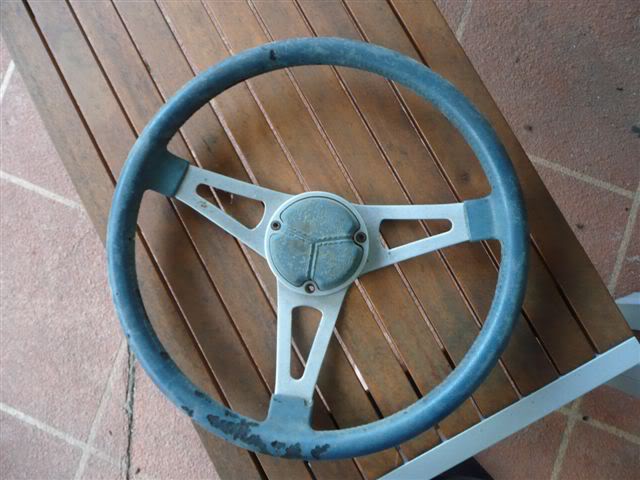
Once again I have rethought the interior, a Chrysler mate had parted out a CM Regal wagon and I managed to get a complete interior off of him in the medium blue colour that I prefer to the LeBaron Dark Blue, and is a better match for what I have planned for the rear interior. It should clean up a treat and the photos don't do the colours justice, but its a perfect match for the blue 3 spoke twirler I picked up many years ago at the Chrysler Expo and had forgotten that I still owned:
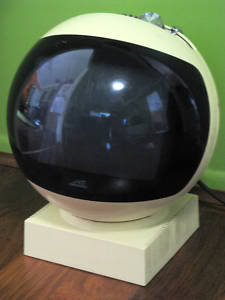
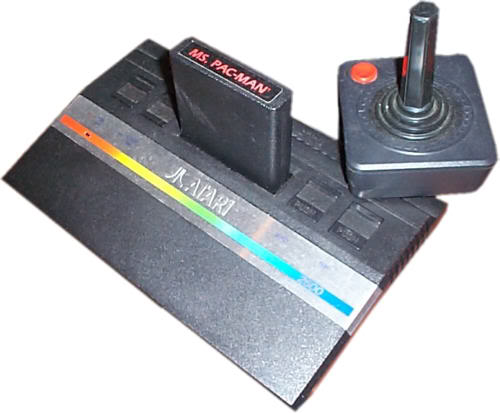
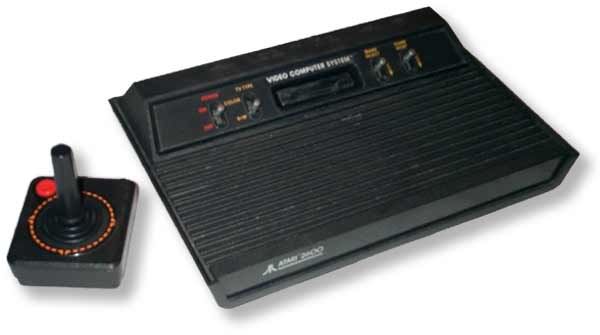
Speaking of the rear interior, some more goodies have steadily arrived including this 70's JVC videosphere TV which will look sweet hooked up to the Atari 2600 as well!
Aaaah the good old days...
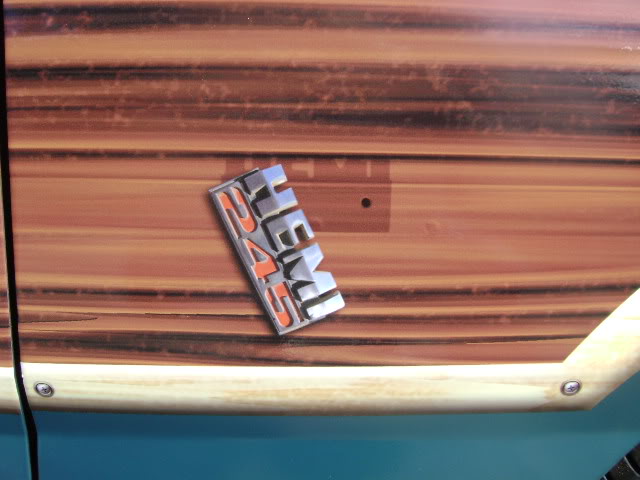
Someone who is making some mega progress is my mate Jamie who took over the VG Safari I bought when I already had a full plate of cars and pictured here a few pages ago; he isn't messing around and here's the exterior with the surfin safari printed vinyl he designed and fitted, moonies and whitewalls and I gotta tell you he's making it damn cooler than I would have ever got around to doing, how's the detailing with the badges and stuff!?! The timber print is quite deceiving as its actually all one dimensional, but gives it a very cool look and should hopefully be at Mopar Sunday in July:
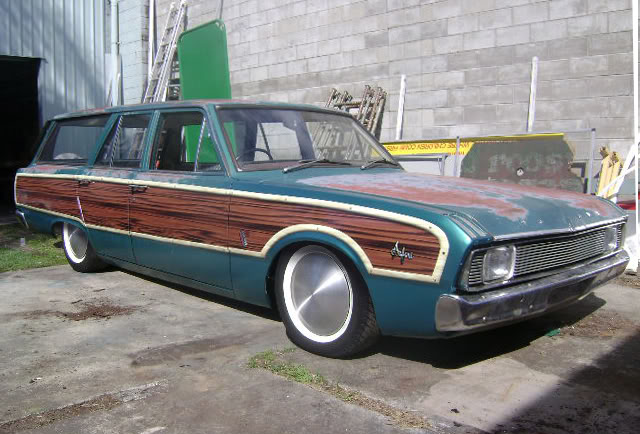
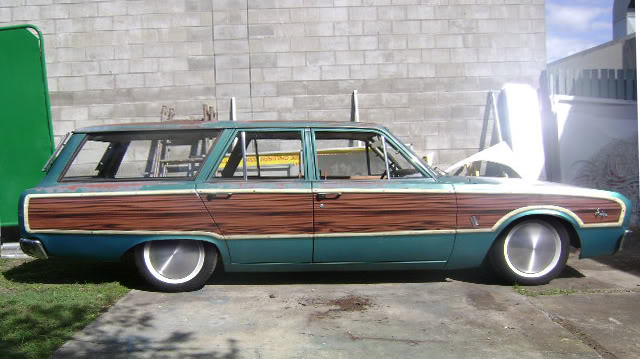
This wagon is going to be super cool when done!
have fun
Simo
Guest- Guest
Re: The John Holmes CL Valiant Pornovan Project
![]() by highwaymenace 11/5/2010, 12:44 pm
by highwaymenace 11/5/2010, 12:44 pm

highwaymenace- Posts : 1912
Join date : 2008-08-13
Location : Geelong -
Re: The John Holmes CL Valiant Pornovan Project
![]() by Ramble 11/5/2010, 2:58 pm
by Ramble 11/5/2010, 2:58 pm
Would hate being your naubours though, Week end...OH NO simons got his grinder out AGAIN...

Ramble- Posts : 566
Join date : 2009-02-23
Location : mid nth coast nsw
Re: The John Holmes CL Valiant Pornovan Project
![]() by Guest 15/5/2010, 12:57 pm
by Guest 15/5/2010, 12:57 pm
Can't wait to see it finished.
Oh and by the way GREAT story on the FJ pano in the latest SM.
Congrats for that as well.
Guest- Guest
Re: The John Holmes CL Valiant Pornovan Project
![]() by mazdragon 16/5/2010, 1:57 pm
by mazdragon 16/5/2010, 1:57 pm
and yes dear, i give you permission to chrome the nose cone....
mazdragon- Posts : 1973
Join date : 2008-08-14
Location : somewhere on the planet in my den
Re: The John Holmes CL Valiant Pornovan Project
![]() by Guest 25/5/2010, 9:55 am
by Guest 25/5/2010, 9:55 am
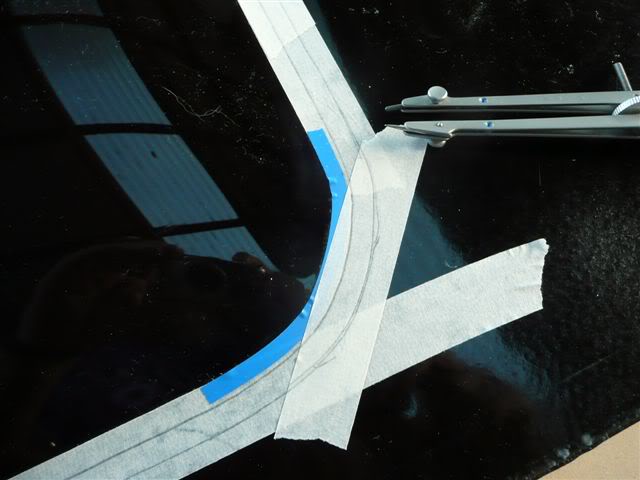
Things have been chugging along over the last couple of weeks so this should get you up to speed. First up it was a flashback to High School Graphics to work out how the hell I was going to neatly trim out the bubble windows! It's a bit hard to mark them out (especially upside down!) so it was out with the compass from the Kent set to get some mirror lines all sorted:
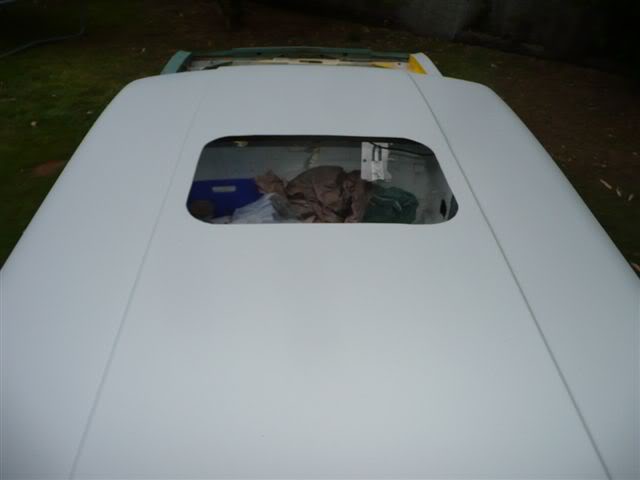
I managed to finish the prep work on the altered moonroof and am pretty happy with how its all come out; the only real problems I had were the fact that the pressings were slightly different which is pretty bloody typical late 70's Chrysler quality for you! So in the end the pressings now exist again and I added a good 70mm or so to narrow up the new bubble window hole:
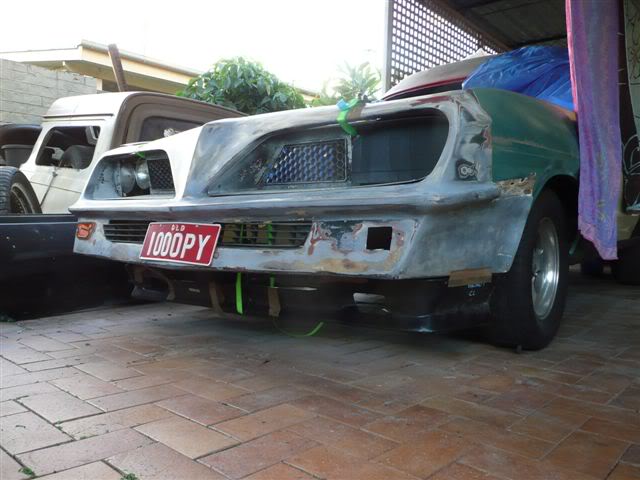
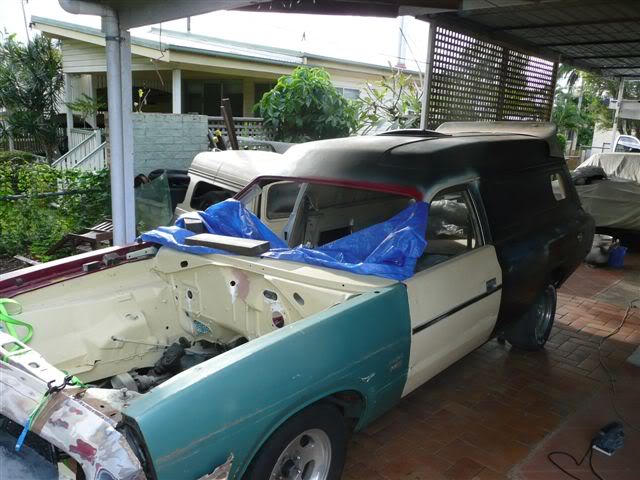
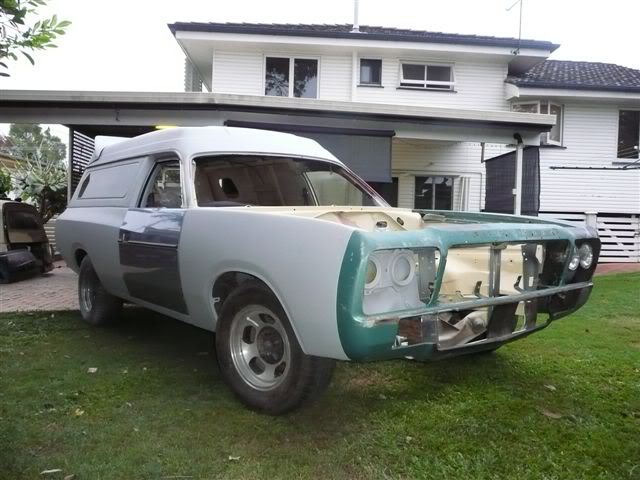
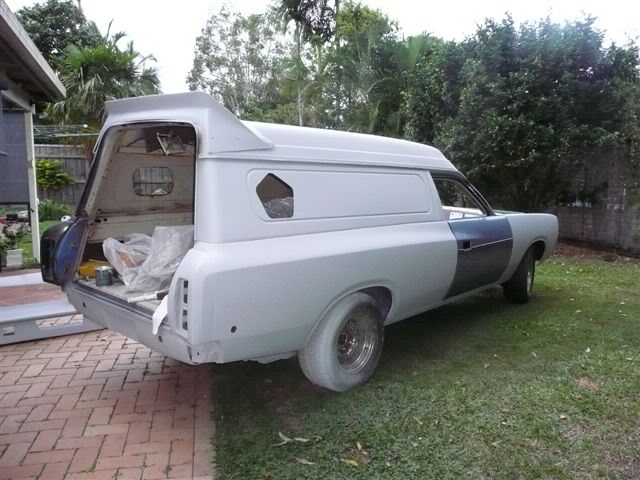
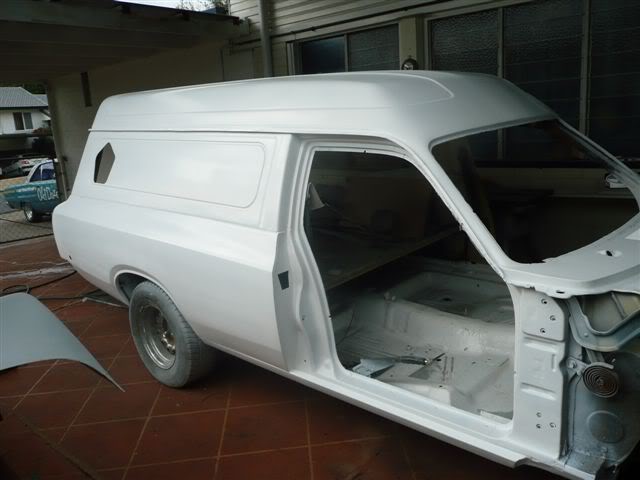
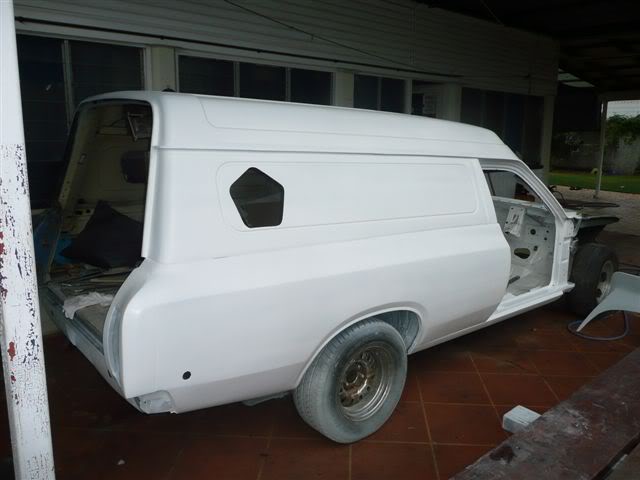
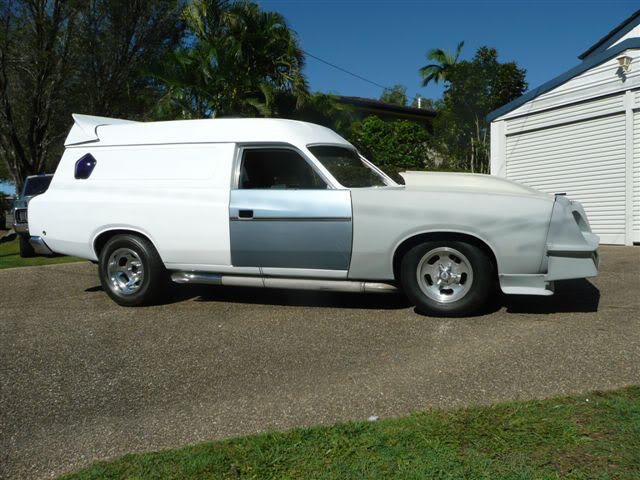
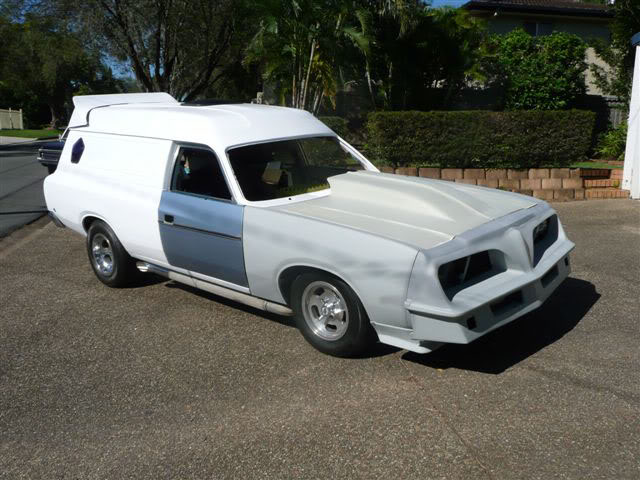
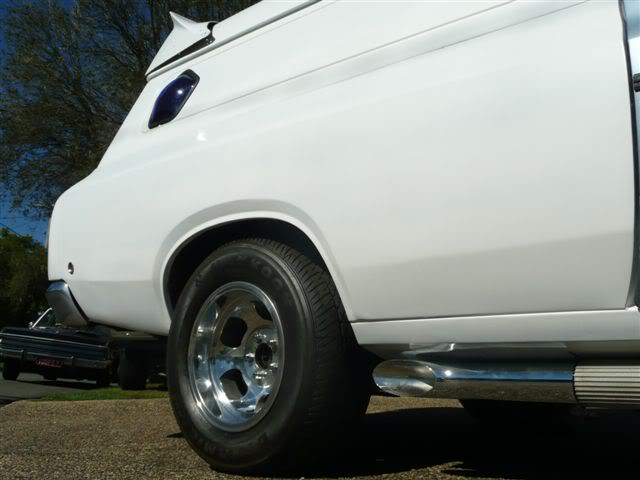
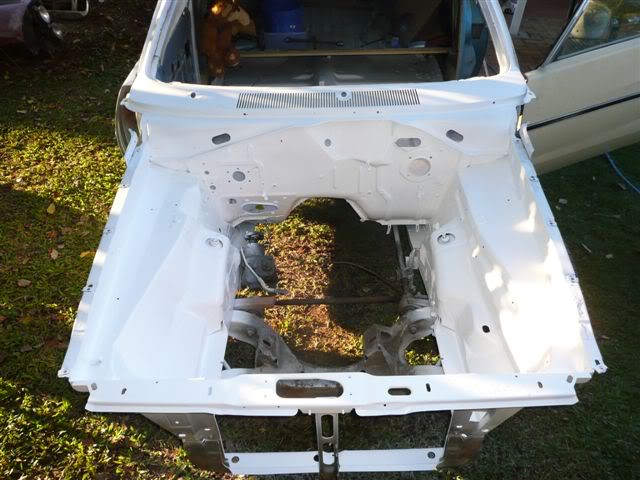
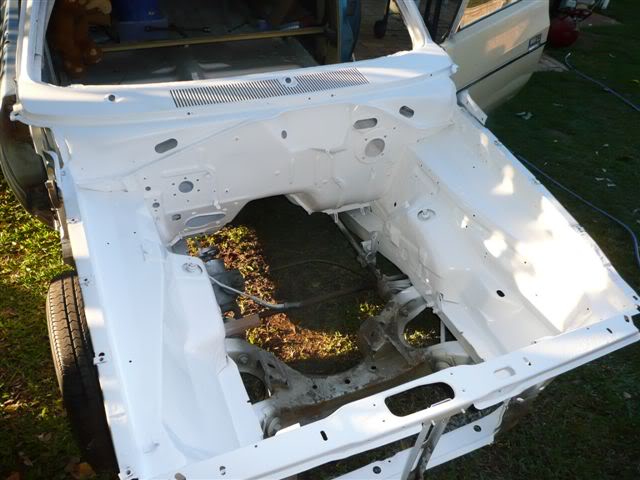
I blocked back all of the hi-fill/guidecoat a couple of weeks back and made a couple of touch ups to get it as straight as possible. Then after getting the roof prep sorted, I laid a few good coats of primer over the turret and right side again which will hopefully be the last of the right side prep - if you're sick of seeing right side photos of the Van, then I can guarantee I'm sick of taking them! I had to do a couple of small last minute gutter rail repairs today but I'm seriously running out of time to paint before it gets too cold. It was great to have absolutely no repair work to do to the front guard, it was a welcome relief that's for sure. I also bolted up the spare nosecone which will cop the Trans Am front graft. The roof spoiler still needs to be glassed in to get it nice and smooth and will need a trim here and there to adjust from its former life on a HT pano. Its actually starting to look like a car!
The CM Regal nosecone I'll have too will run a super deep spoiler like on this XC:
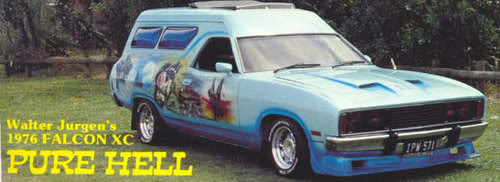
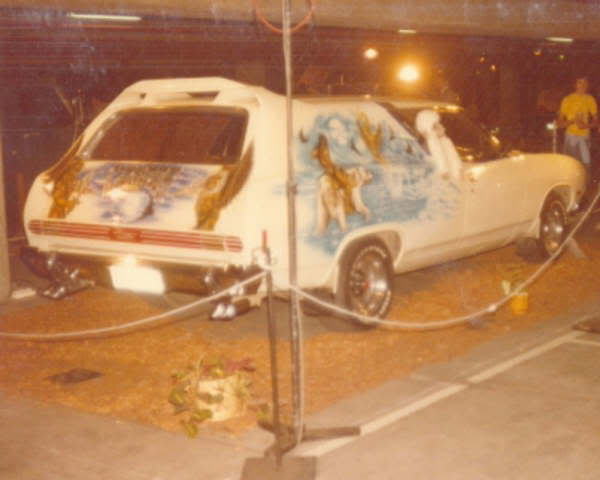
And here's a couple of other fronts that you may remember from back in the day and it wasn't unusual for owners to have tried 2 or even 3 different nosecones to keep them ahead on show points; Midsummer Nights Dream was hugely popular in the 70's:
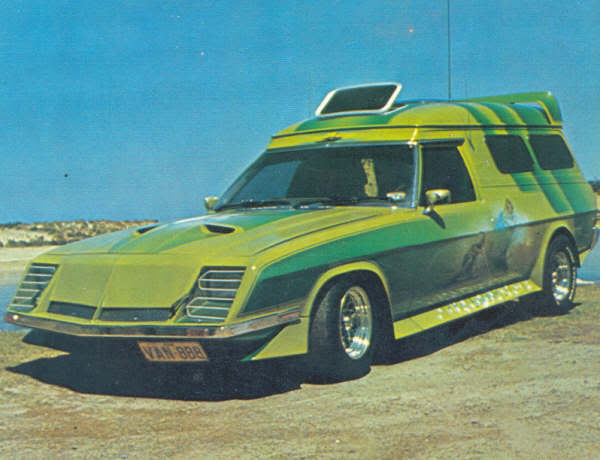
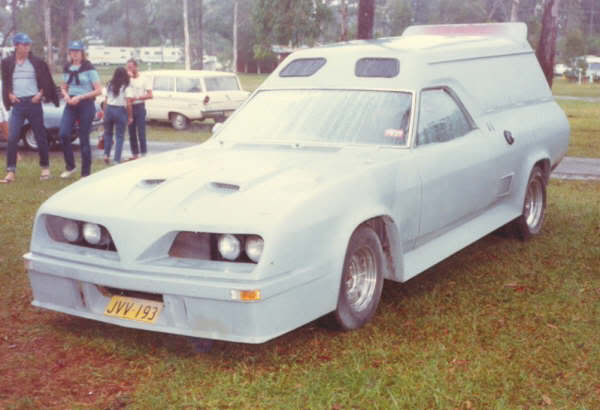
And Street Legal is still doing the rounds today:

Had a few good ebay scores too including a couple of old school Atari 2600's which will go nicely in the back with the JVC pacman TV from last week:
So now all I really need is a quadrophonic car stereo (wireless?) set-up and about 5 graphic equalisers so I can crank "Shoop Shoop Diddy Wop Cumma Cumma Wang Dang" (from the early 80's band Monty Video and the Cassettes) while I cruise in my 2 door midlife crisis... bet you won't be able to get that song out of your head now!
Last weekend there was some seriously obvious progress made which is a relief in more ways than one. First up is the fact that the Van actually looks different which is providing some serious motivation and secondly all of my right side and roof repairs are sealed up with paint to keep away the winter moisture from the primer.
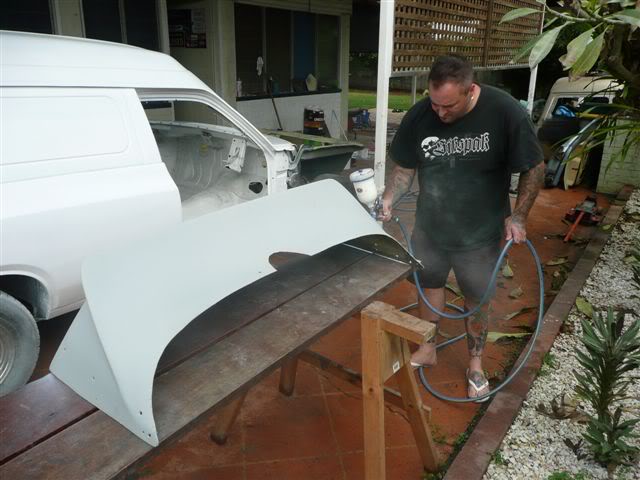
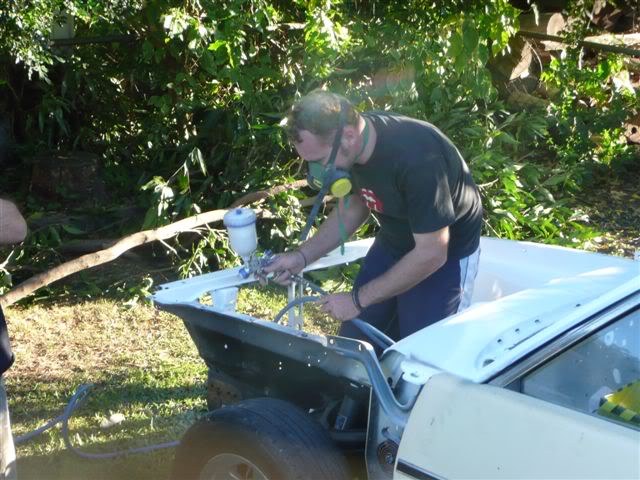
So it all unfolded with the offer from a mate to hang out on Friday and help with some prep and paint. So Mon-Thurs after work was spent madly getting things rubbed back and ready after last weekends hi-fill job and we laid on a few good sealing coats of white to the roof and right side. Now I'm used to painting cars with the usual Forrest Gump friendly vacuum cleaner spraygun which is simply 'pull the trigger' so a big thanks to some paint-savvy friends for their tips on how to use a proper gun with the few extra knobs and dials and also for the lend of the compressor!

A bit of a mock-up was on the cards so while the white was out we decided to give the roof spoiler a quick hit:
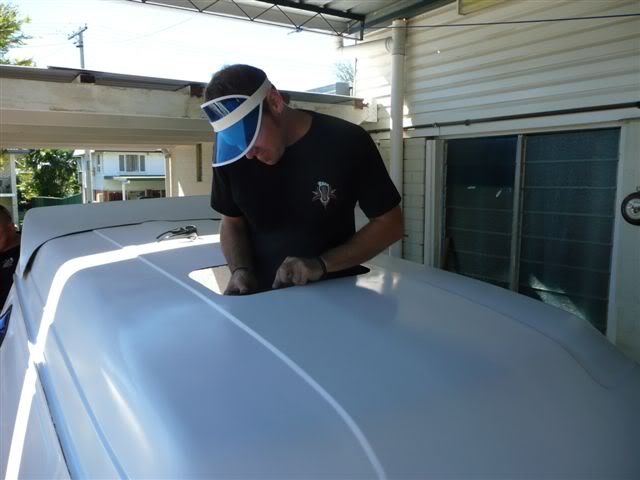
Then on Saturday it was time for the mock-up, here I am refitting the moonroof:
Trinity takes it pretty easy after dealing out a few packs of cards, or was it the tuner from 'Running on Empty' imitation?
We'd given the Transam front a bit of a touch-up on Friday to make it basically fit and now just requires some final shaping. upper pressing detailing and lower spoiler sorting to get it 100%. Then it was on with the real mags, sidepipes and side windows and outside for some shots!

And look who's back...

Then it was back to the not-as-fun stuff. The front clip was stripped off (but at least we didn't drop it off into dogshit like we did on Friday) and the engine bay was rubbed back with many hands getting it done in about 10 minutes with a lot of laughs along the way. Drying time was the perfect chance to have a BBQ then it was into the *cough* spray booth for a few solid coats of white to get this off the to-do list!:
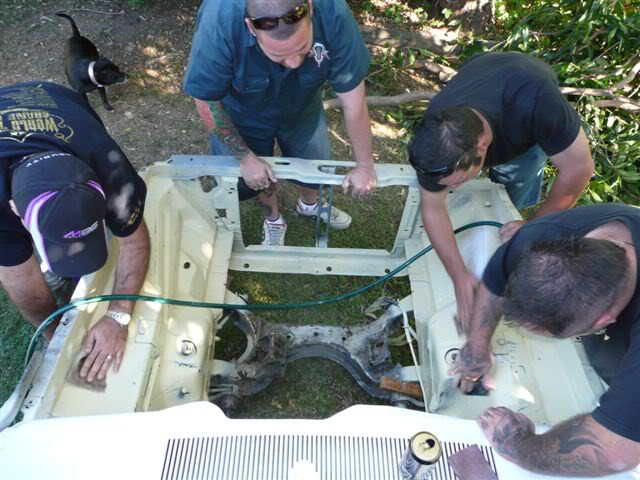
She's come a long way from the rusty mutant heading off to the scrappers!!
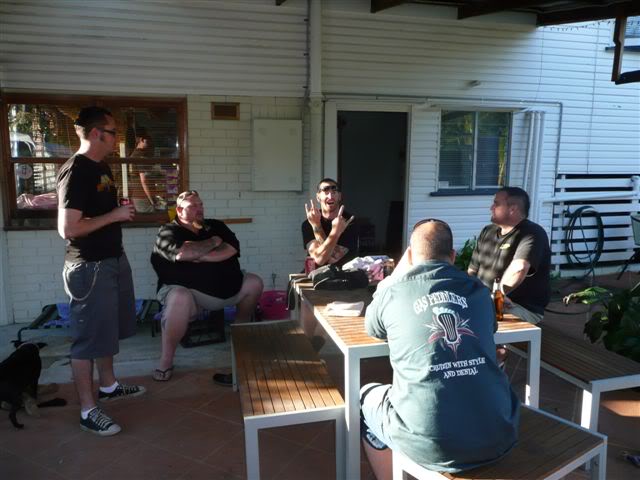
One of the best parts of doing this Van is the get togethers with friends and laughs we have along the way. There's always some extremely diverse 'conversation' and its been the highlight of the project so far! Thanks a bunch!
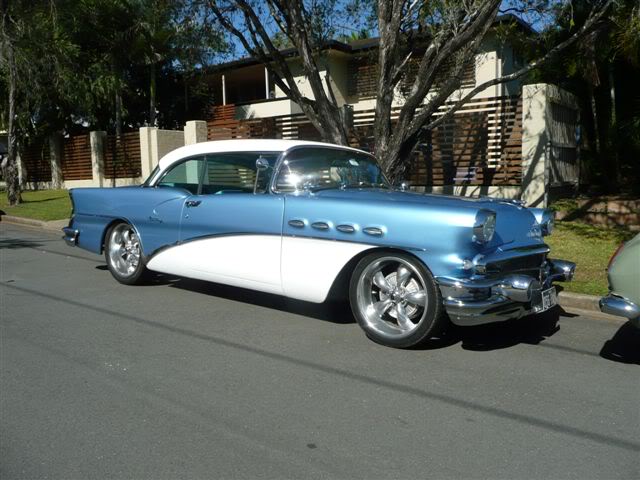
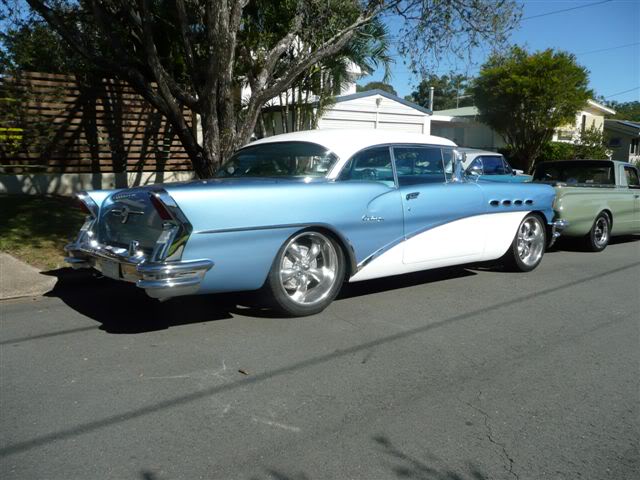
It doesn't hurt to have a few cool cruisers parking up either; here's Smithy's Buick, its a corker and cops plenty of miles around SEQ:
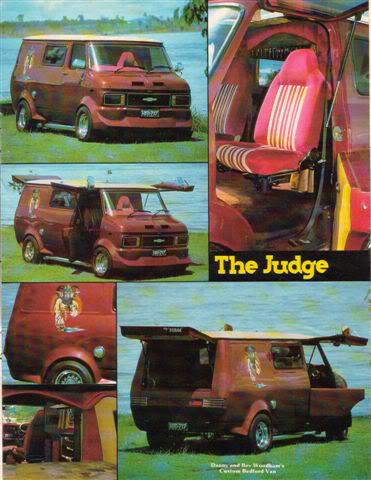
And a bit more Aussie Panelvan 101, with a few cool rides from back in the day, which may also help to explain some of this madness!!

have fun
Simo
Guest- Guest
Re: The John Holmes CL Valiant Pornovan Project
![]() by Rusty62TransAm 25/5/2010, 11:26 am
by Rusty62TransAm 25/5/2010, 11:26 am
Great to someone "Keeping their Dream Alive!"
I'm sure that there are a lot of Green Eyes looking at your Posts.
Good Luck.
regards
Rusty!
Rusty62TransAm- Posts : 191
Join date : 2008-09-18
Age : 61
Location : www.majesticvanners.com -
Re: The John Holmes CL Valiant Pornovan Project
![]() by azwon 25/5/2010, 12:39 pm
by azwon 25/5/2010, 12:39 pm

azwon- Posts : 122
Join date : 2010-04-05
Age : 63
Location : cranbourne west victoria
Re: The John Holmes CL Valiant Pornovan Project
![]() by Guest 25/5/2010, 1:31 pm
by Guest 25/5/2010, 1:31 pm
Can't wait to see the finished product.
Guest- Guest
Re: The John Holmes CL Valiant Pornovan Project
![]() by Pawso1 25/5/2010, 2:17 pm
by Pawso1 25/5/2010, 2:17 pm

Pawso1- Posts : 62
Join date : 2009-06-02
Location : Merewether Newcastle
Re: The John Holmes CL Valiant Pornovan Project
![]() by Guest 13/6/2010, 5:21 am
by Guest 13/6/2010, 5:21 am
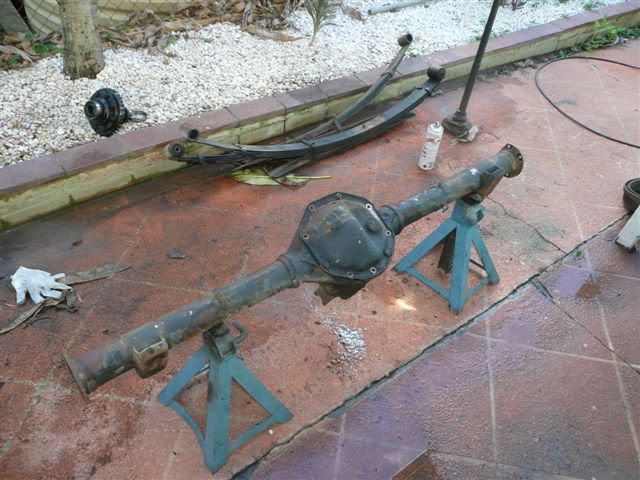
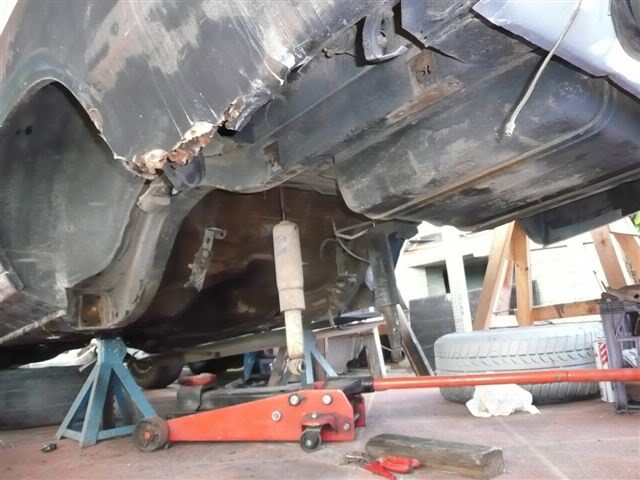
I'll whizz the tank out soon as well, and start giving the underside a good clean up before a few coats of street friendly gloss black:
You can see how trashed that left rear lower 1/4 is... And how's the 1980 spec air shocks? No surprise really! They won't be going back in..
Next port of call was sorting out the rear springs. In tune with keeping this as a backyard, back to basics build-up I decided to return to my youth and take out the worn spring eye bushes using the old school method of melting the rubber and hacksawing the steel sleeve. Old sunroof's never die, they just become good fire boards. It all went off without a hitch and with no melted spring insulators, although the marshmallows tasted a bit like old tyres:

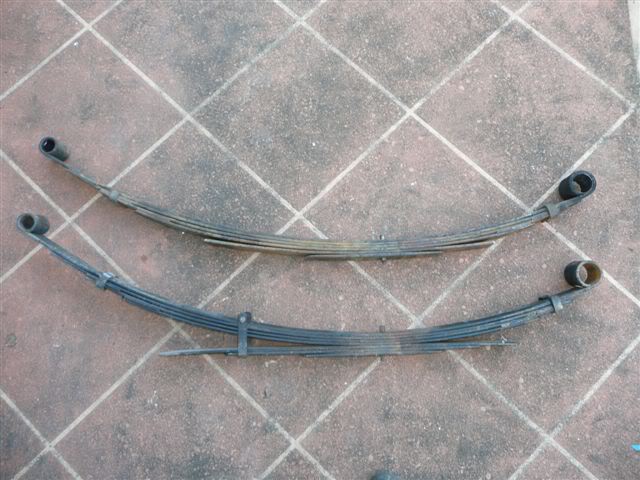
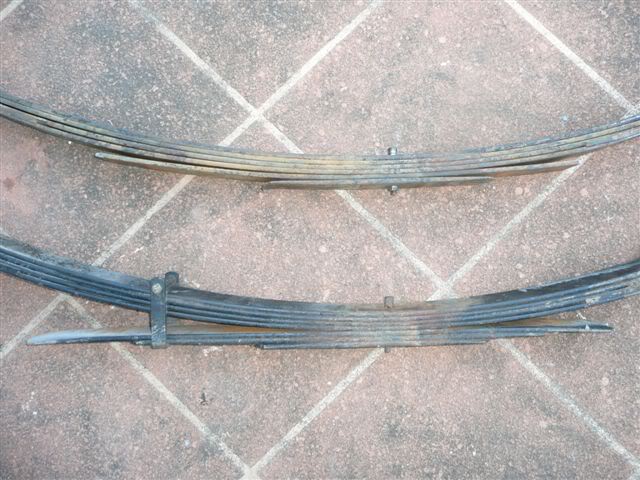
This thing had a 7 leaf commercial/towing set-up which uses 4 normal springs and 3 helpers which is soft-ish at the start then gets pretty taut as it gets low. Not only do they look shite with crap hanging down everywhere for the side view, but its a serious overkill for what I have planned for this. So to that end I ditched the 2nd and 3rd lowest springs and replaced it with a single shortened leaf from a spare spring pack which will hopefully give it a softer ride for its full travel but also keep it high enough for tyre clearance and the sniffer rake. The extra leaf makes it slightly firmer under initial loading compared to the original top four, plus the Tramp Rods that are on the cards stiffen up the springs pretty badly anyway so we'll see how it rides. Once its all back together and the interiors in I'll get them reset higher or block it lower if required, depending on how it settles. Here's the modded pack at the top and originals underneath:
At least it won't appear like its got some sort of weird tramp rod hanging out the rear like they've been put on back to front now:
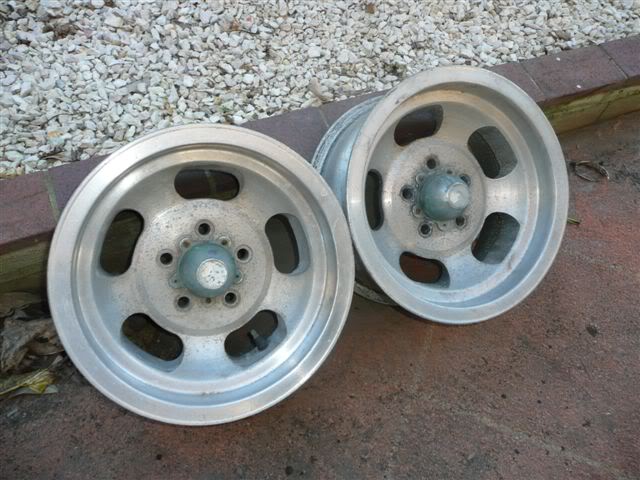
I was at a swap on Sunday and stumbled on these 14x7 US Racers for $70! They're in corker nick and are a perfect design match for the big US Racers on the back, and I'll put them aside in case they're needed for the front with maybe a 205/70 or 205/75 tyre to keep the high sidewall 70's look.
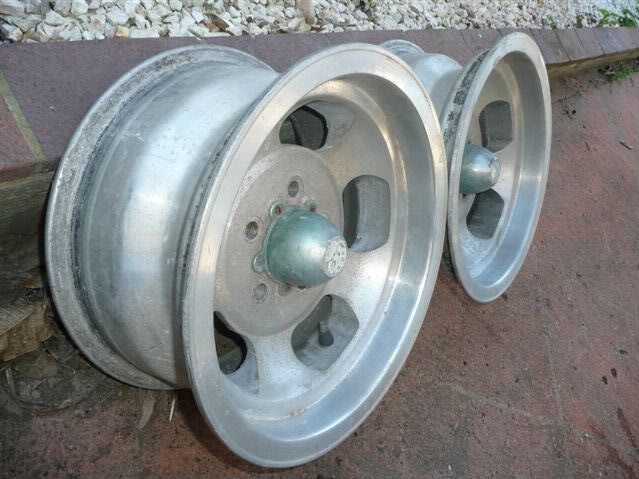
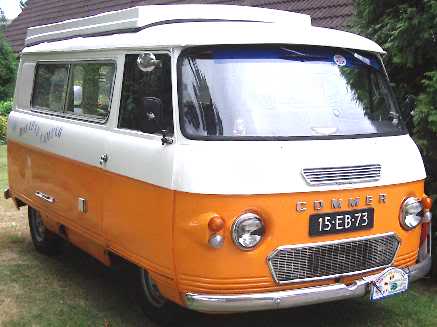
Although I was pretty set on the 6" front rims, I can't look at the last mock-up photos without thinking that the 6's and 185 tyres on the front just look way too small with too much inset, and every time I look at those pics it keeps reminding me of one of those old gumby Commer Vans like the pic below. I think it'd be fine if it had a standard front nosecone, but the size and overhang of the Trans Am nose bulks it right up.
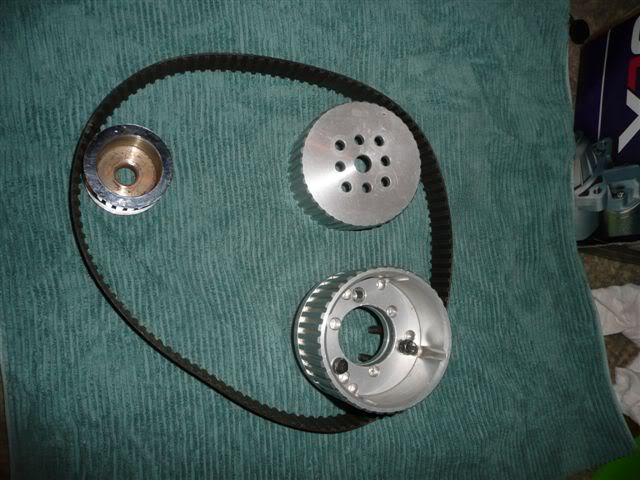
Some more goodies arrived this week including a Gilmer pulley set. The pulleys I have are all Power Steer and Aircon triple grooves so that seemed like a good excuse to grab one of these:
Here's a bit more old school Ford action from the 1983 Brisbane Hot Rod Show and 1984 Valla Park Van Nats;
First up the 'Condor' XC Wagon
Mark Booker's extremely popular 'Total Eclipse' with LTD front and Jag diff, my mate James the Vanner says this is still around and currently being rebuilt. I have a very cool photo of this towing Mr Damage too somewhere..

This XB is pretty standard fare as Vans merged from the basic Surfie Culture mods through to the Wild Customs at the end of the era. This is the style I like, some custom mods but not too over the top with skirts and gullwing doors etc. like Invader 2001.

Now this is a bit over the top even for my tastes, or may be its just the extra windows in the header panel. A few people have asked and commented that my Van would look better with a spoiler that went right to the front underneath the Trans Am nose, this is exactly why I steered away from that look. It just seems too heavy and way too loooooong... Would have been cool to see it finished though!
have fun
Simo
Guest- Guest
Re: The John Holmes CL Valiant Pornovan Project
![]() by Rusty62TransAm 13/6/2010, 6:39 am
by Rusty62TransAm 13/6/2010, 6:39 am
Mailman delivered my copy of the latest Street Machine on Friday.
Great write up on your build!
Keep up the Good Work and "The Dream Alive!"
Keep on Vaniin'!
Regards
Rusty!
Rusty62TransAm- Posts : 191
Join date : 2008-09-18
Age : 61
Location : www.majesticvanners.com -
Re: The John Holmes CL Valiant Pornovan Project
![]() by Big Bunny 13/6/2010, 11:51 am
by Big Bunny 13/6/2010, 11:51 am

Big Bunny- Posts : 108
Join date : 2008-08-21
Age : 56
Location : Northern Suburbs Melbourne
Re: The John Holmes CL Valiant Pornovan Project
![]() by azwon 13/6/2010, 4:10 pm
by azwon 13/6/2010, 4:10 pm
azwon- Posts : 122
Join date : 2010-04-05
Age : 63
Location : cranbourne west victoria
Re: The John Holmes CL Valiant Pornovan Project
![]() by mr sinbin 24/6/2010, 5:14 am
by mr sinbin 24/6/2010, 5:14 am
just read the article on disturbia in the lastest street machine! nice work mate, good to see some vans getting a bit more coverage!! was a great read and the photos wer awesome too!
congrats!
cheers
matt

mr sinbin- Posts : 69
Join date : 2010-01-22
Age : 33
Location : mid north coast
Page 5 of 8 • 1, 2, 3, 4, 5, 6, 7, 8 ![]()
» New member
» My xy van project
» MY NEW WB PROJECT
» Holden vans with John Goss style roof spoilers
» Squaw in the modern age of Vanning
» Fire Truck roof spoiler
» CAR SHOW AT BOWRAL NSW
» A van only magazine needed? Are you interested?
» October 19th
» Fathers Day Hot Rod Show 2014
» hsv front to a HJ
» REGO PLATES