


The John Holmes CL Valiant Pornovan Project
Page 7 of 8 •  1, 2, 3, 4, 5, 6, 7, 8
 ![]()
Re: The John Holmes CL Valiant Pornovan Project
![]() by highwaymenace 28/12/2010, 1:58 pm
by highwaymenace 28/12/2010, 1:58 pm

highwaymenace- Posts : 1912
Join date : 2008-08-13
Location : Geelong -

Re: The John Holmes CL Valiant Pornovan Project
![]() by hemi4bbl 28/12/2010, 3:45 pm
by hemi4bbl 28/12/2010, 3:45 pm
Now I'm glad I did!
Simo
hemi4bbl- Posts : 33
Join date : 2010-08-06
Re: The John Holmes CL Valiant Pornovan Project
![]() by Monk 2/1/2011, 2:25 pm
by Monk 2/1/2011, 2:25 pm
really enjoying watching you build this van & keep up the gret work

Monk- Posts : 226
Join date : 2008-10-20
Location : Morwell Victoria -
Re: The John Holmes CL Valiant Pornovan Project
![]() by hemi4bbl 3/1/2011, 1:44 am
by hemi4bbl 3/1/2011, 1:44 am


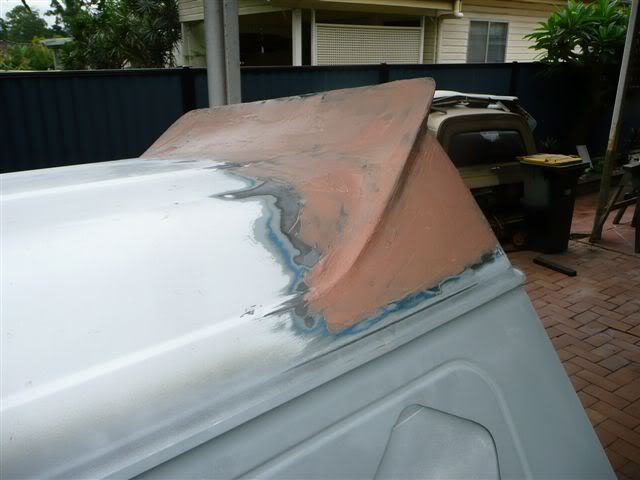
Then it was a matter of building up the layers and working the shape of the upper corners:


Unfortunately I couldn't do continuous layers due to the stop/starting I had to do to help with the adapting process, where I had to let some sections cure before I could modify something else (for the cuts and splits all through to help it take shape). That was a real pain in the ass as it meant I had to keep sanding it back between coats which is a chore with 'glass, but I managed to lay down two decent fibreglass layers one directly after the other which should go ok with the two I've already got sorted. 2-3 layers was what was recommended to me but figured an extra won't hurt.


I'm actually pretty happy with how its come up and the overall shape is what I was after, there's had to be a few design compromises on the centre of the rear section to make it fit but I don't think it'll detract from it too much. I just need to do some more finishing work at the lower side area near the factory seam which I'll hopefully knock over today.
There were only two real hick-ups that I should try and avoid next time:
1. I pretty much fibreglassed my thong to my foot which wasn't the go, especially as I was in the middle of rolling the roof layers with it curing!
2. I did a massive deep-belly burp about two minutes after scoffing down some leftover Indian takeaway, which in itself isn't a bad thing, however I'd just fitted my twin-filter dust mask and the belch was contained within the confines of that mask and on the wrong side of the filtration process. I was a bit woozy for a while but managed to regain full consciousness with some fresh air...
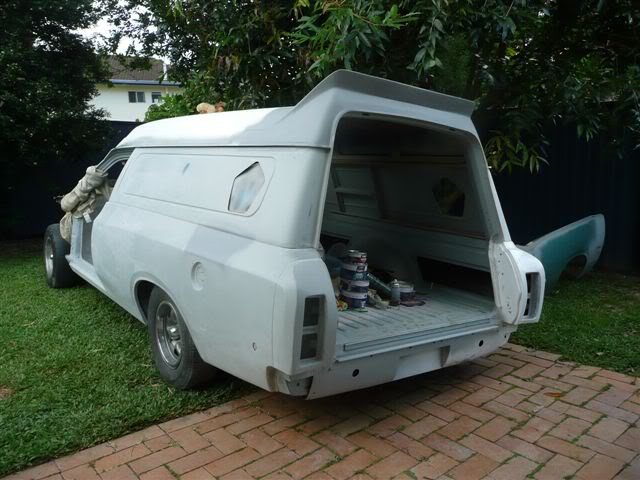
As well as busying myself with the spoiler I've been trying to get other sideline stuff ready no matter how big or small, just to give me less to do at crunch time for when it all starts going back together.
So it was into some detailing which started off with the master cylinder/booster assembly which was cleaned painted and polished up ready to bolt back on. A new master cylinder all silvered up and cleared, black offset linkages plus chrome for the bracket and reservoir lid seems to work nicely with the VHT bright red booster which will actually be the engine colour too. I've always been a fan of red donks in white engine bays so should look era correct too, especially with some of those wing nut thingos for the (chrome) tappet covers!


Then I dabbled with some interior stuff, fitting new speakers to the CM Regal kick panels and cleaning up the matching Regal seats. My mate 'the interior whisperer' put me onto a quick way to get them sorted, a few squirts of spray and wipe then a pressure clean and those seats have come up 1 million % better than they were; the shite that come out of them was unbelievable and they dried out nicely within a couple of sun soaked days. There's a couple of tiny spot marks that need sorting but I'll get onto a more serious scrub there or even just give them a gentle dab with some matching blue I have. Of course within the time it takes to go get the camera, our dogs are making themselves comfortable on them - I can understand Alf calling shotgun, but with Daisy behind the wheel there's bound to be trouble. I also picked up a full set of carpets in light blue after avoiding red; I was originally going to go for a lairy Hang-Ten Plymouth Scamp-style interior but thought I'd keep the front area pretty standard.

Another niggle I managed to sort out last week too was how the hell I was going to finish the chrome edging around the rear gutter rails. As you may recall, I bought a swag of CL wagon chrome which fits perfectly along the straights but the corners required some tricky hammering to get the pieces to curve. I had a few practice goes and could get them on ok, but they always ended up a little distorted and flattened which really wasn't going to make the grade aesthetically on the final product.
Thankfully in my job I spend a fair whack of time behind the wheel and get to work with heaps of different cars, so its a good chance to ponder what parts can be adapted. Usually I ponder about panelvans, food and Jennifer Love-Hewitt (and sometimes even a combination of all three) but a couple of weeks ago I noticed that a 60 series Cruiser had similar type chrome gutter moulds at the back. When I had a close look however, they looked to be too wide which wasn't going to work, so I started looking at similar era vehicles that still had gutter moulds. Vans and fourbys topped the list and I got close with an L300, but in the end it was first generation Pajero that came up trumps. Mate these trims are meant to be and are nearly the exact profile as the CM type so will morph nicely in withe the stock wagon front strips. Here's one I prepared earlier on Mr Juicy:

I also got the last of the fibreglassing of the rear spoiler done this arvo, which is a relief, but its all just a prelude to sorting out the nosecone which spends its days winking at me from the corner of the backyard as a gentle reminder of things to come...

have fun
Simo
hemi4bbl- Posts : 33
Join date : 2010-08-06
Re: The John Holmes CL Valiant Pornovan Project
![]() by hemi4bbl 8/1/2011, 11:09 am
by hemi4bbl 8/1/2011, 11:09 am
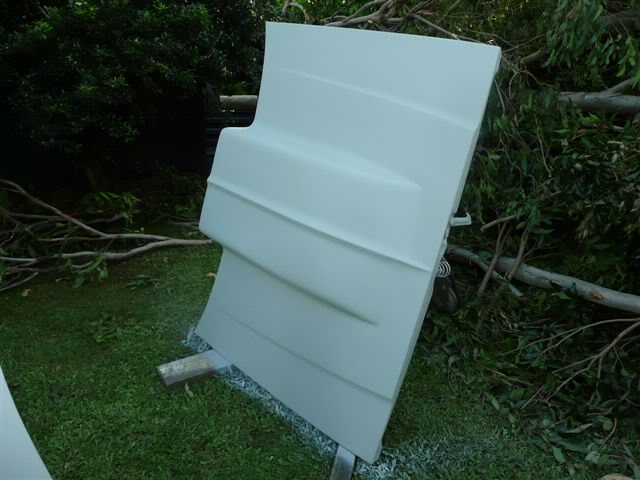
As I mentioned a few pages back, the roof pressings are awkward on Val vans so are best to be made a feature and not just poorly veiled, so I blended the forward tips in to make it all look like its meant to be. The pics don;t really show it too well but I've made the side pressings of the roof blend into the spoiler by matching the width and curvature between the two. The spoiler itself has had a hard life before I even started messing with it, so most of the work has gone into getting that sorted in the first place.
First up was to start making it one piece:


Then it was onto shaping and smoothing all of the joins and 'glass joins:


I'm extremely happy with how its looking so far and really enjoyed messing around with it, so hopefully if all the finishing goes well and comes up pretty straight it'll have been worth the effort.
As you can see in the last batch of photos, its got a messy skim coat of filler over it so tomorrow I'll be rubbing that back to get it smooth then doing any extra finishing it needs.
have fun
Simo
hemi4bbl- Posts : 33
Join date : 2010-08-06
Re: The John Holmes CL Valiant Pornovan Project
![]() by highwaymenace 12/1/2011, 2:54 pm
by highwaymenace 12/1/2011, 2:54 pm
highwaymenace- Posts : 1912
Join date : 2008-08-13
Location : Geelong -
Re: The John Holmes CL Valiant Pornovan Project
![]() by Crackers 15/1/2011, 10:05 pm
by Crackers 15/1/2011, 10:05 pm

Crackers- Posts : 102
Join date : 2008-12-21
Age : 54
Location : Beaconsfield (VIC) -
Re: The John Holmes CL Valiant Pornovan Project
![]() by hemi4bbl 16/1/2011, 1:13 pm
by hemi4bbl 16/1/2011, 1:13 pm
Talking about sanding my ass off and geez I hope I never have to do this again! What a mission but the hard work is paying off and is actually looking better than I hoped for. I ended up doing 2 skim coats then a couple of spot coats to get it all straight:

I've been a bit concerned about how the rear centre 'seam' was going to look (half way up the spoiler), with all of the modifying and manipulation to fit the Val roof it had a real smiley curve in it that would annoy the shit out of me every time I walked past it. It was really noticeable once I etched primed it (below) so I redid it this morning to straighten it out a bit (raised the lip about 10mm in the centre). It was worth the extra hours work and the photos probably don't make it look as bad as it was:


So with that done it was back to final finishing with some etch and primer giving it some closure. Here's a few thousand angles:


I also finally got my wheel/tyre combo sorted. Fronts are 15x7's and rears 15x8.5's running 205/65's and 255/60's respectively. The 205's are some spares I had lying around as I may go for some slightly taller tyres depending on how these look with the heavy appearance, bulk and length of the Trans Am front. You know when you see a Torana with a full flare and spoiler kit and its still running stocko 13x5's and 175 tyres? I don't want it to resemble that. I bought some 3 bar spinners that knock onto alloy centre caps and chose the American Racing decals to finish them off:


I was away in Cairns with work last week and when I wasn't stressing about the floods back in Bris and glued to the TV, I decided to get into some more evening Hotel-reco action just to keep things moving forward, and to that end cleaned, sorted and detailed the door handles and fully rebuilt the front calipers with new pistons and seals etc. Brakes are brakes so there's no point stuffing around:


And the big newsflash is that there might be some changes on the horizon. It's been on my mind for a couple of weeks now and a mate popped over today and respectfully bought up the same thing, totally out of the blue - he made some good points and we could see where each other was coming from. My main concern is the Van looking too 'busy' with so much happening paint-wise, flames unfortunately have been 'cheapened' these days IMHO with the fact you can buy flamed junk everywhere, and the fact its not going to be done as a true Denimachine replica might get confusing, especially as BJ has an excellent replica doing the rounds and I don't want to rain on his parade. Jim was pointing towards me making it something totally fresh and original, something that looks like its skidded straight out of the 80's and will always be 'Simo's Van', not a 'mockup of something built by Simo'.
So I'm seriously thinking of ditching the Denimachine flamed red, white and blue paint scheme and doing it in either full Sting Red (VZ Commo etc.) or factory Stellar metallic Blue with murals on the side of either colour. I'm interested in hearing peoples opinions/thoughts so please feel free to respond.
have fun
Simo
hemi4bbl- Posts : 33
Join date : 2010-08-06
Re: The John Holmes CL Valiant Pornovan Project
![]() by highwaymenace 16/1/2011, 1:54 pm
by highwaymenace 16/1/2011, 1:54 pm
but its not my van i know its gunna be wild what ever way you go
a big fan
Daz
highwaymenace- Posts : 1912
Join date : 2008-08-13
Location : Geelong -
Re: The John Holmes CL Valiant Pornovan Project
![]() by hemi4bbl 19/1/2011, 1:10 pm
by hemi4bbl 19/1/2011, 1:10 pm
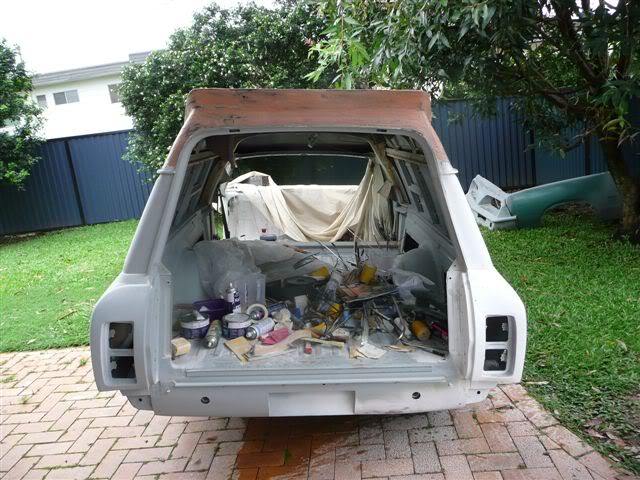
There's my Trans Am front hiding amongst it all, miraculously the main branch got held up on another tree so didn't squash it. I braced the branch and managed to crawl in to its hidey hole and drag it out before it had the chance to have a second go:

and a couple of overall views:


half-a-Holden copped it:

and the neighbours insurer reckons it could be up to two weeks before the treeloppers come to chipper it away because of all the other drama going on in SEQ at the moment.
But anyway, I still plugged away this arvo, citric aciding my soda-blasted front guards, cleaning them off and giving them an etch prime, I've got a couple of small repairs to do and will go for hi-fill by the weekend hopefully:

We finally worked out to paint the roof too:

I'm pretty much a definite now for a solid colour now with murals and its come down to three colours, remembering that I want something that murals will stand out on. First and most probable is the bright red found on BF Falcons:

2000 era Holden Rodeo Blue (sorry for the crappy pic, it was hard to find!)

and lastly is the aqua/light blue colour you sometimes (rarely) see on VZ Commodores and Monaro's, a similar shade to what HJ's etc. had in the 70's. Very close to this Monaro colour but more of an aqua too it:


have fun
Simo
hemi4bbl- Posts : 33
Join date : 2010-08-06
Re: The John Holmes CL Valiant Pornovan Project
![]() by hemi4bbl 22/1/2011, 1:14 am
by hemi4bbl 22/1/2011, 1:14 am
So by stumps yesterday I had it all etched and hi-filled which feels like a big chunk of work out the way:

I was originally going to go with an L88 Corvette scoop but I tried one and it looked a bit odd with the lines of the Chrysler bonnet, so this pre-done Camaro scooped bonnet was an easy fix:
and it was good to see the old treebanger that is still filling up my backyard was able to come in handy too:

I'll let it all harden up in the sun now for a few days and rub it back in readiness for some white base coats next weekend.
have fun
Simo
hemi4bbl- Posts : 33
Join date : 2010-08-06
Re: The John Holmes CL Valiant Pornovan Project
![]() by highwaymenace 22/1/2011, 11:23 am
by highwaymenace 22/1/2011, 11:23 am
highwaymenace- Posts : 1912
Join date : 2008-08-13
Location : Geelong -
Re: The John Holmes CL Valiant Pornovan Project
![]() by hemi4bbl 30/1/2011, 11:37 am
by hemi4bbl 30/1/2011, 11:37 am
So with the panels and primed and rubbed back, it was time for some light coats of white base to get the whole lot sealed up and ready for top colour. Thank fark for that is all that I can say. Last bits of rubbing back:

and all the under-surfaces were whited out:

It was about this stage that I tried to tap an inch long 5/16" UNF thread into the base of my foot which called for a few stitches, and I wouldn't recommend to anyone to stand on the vertical factory floor stud that you bolt a child restraint to in a Valiant panelvan... Can't help but think of that joke 'Hey mate you lost a thong...."; "Nah buddy, I found one!".

So old hop-along added white to the rest of the Van and all of the outer panel surfaces:


A good mate Simon is extremely artistically talented and has put up his hand to airbrush the murals for me which will be great, not only is he a Mopar man to boot, but it helps to keep the build in the circle.
And this is what happens when you fall asleep at the shops with a sore foot....

Not quite the truth but a great Inbetweeners moment anyway..
Next up: TRANS AM Front Wooohooo!!!!

have fun
Simo
hemi4bbl- Posts : 33
Join date : 2010-08-06
stabby stabby
![]() by Mans Ruin 31/1/2011, 3:42 am
by Mans Ruin 31/1/2011, 3:42 am

Mans Ruin- Posts : 59
Join date : 2010-01-31
Age : 37
Location : Bendigo, Victoria
Re: The John Holmes CL Valiant Pornovan Project
![]() by mazdragon 1/2/2011, 9:46 am
by mazdragon 1/2/2011, 9:46 am


mazdragon- Posts : 1973
Join date : 2008-08-14
Location : somewhere on the planet in my den
Re: The John Holmes CL Valiant Pornovan Project
![]() by hemi4bbl 1/2/2011, 11:04 am
by hemi4bbl 1/2/2011, 11:04 am
Red is the winner too!
Simo
hemi4bbl- Posts : 33
Join date : 2010-08-06
Re: The John Holmes CL Valiant Pornovan Project
![]() by hemi4bbl 2/2/2011, 12:09 pm
by hemi4bbl 2/2/2011, 12:09 pm
Just a quick recap, I'm mounting an original J&G Trans Am nosecone for a HQ (virtually identical to the Vancraft version) to my steel CL nosecone which will then bolt on and off the guards as per standard CL. There's a couple of reasons for this, first up is to make it easy to adapt, and secondly is to make rego a heap easier.
But before the glassing and moulding starts, there's plenty of behind the scenes work needed to prep everything. Now to get this through rego I want to retain as much of the CL front as I can, including the headlamps and a bumper bar of sorts that will be hidden behind the fibreglass shell. To make this happen though I need to be able to bolt the bumper bar on before the nosecone itself, otherwise the bar will be trapped between the two nosecones once they're glassed together with no way to get the bumper in or out which would be a pain in the butt. To that end I was originally going to run a standard front bar, chop about 4" off each end, plate those ends and then cut out anything on the CL nosecone that is in the way so I can bolt on the bar then place the nosecone over it.
So I started by mounting up some mock up CL guards and the factory steel nosecone. The stock CL bumper bar and brackets were then fitted to see what the go was. Unfortunately, its upward sweep meant lots of the CL nosecone was going to have to be cut. So then I went to a VF/VG type bar and brackets which is physically the same bumper bar (apart from 2 of the 8 mounting bracket hole positions) and the kick of the brackets lowers the bar by about an inch when compared to a CL type setup. This was better but I still ended up needing to trim a fair bit of meat from the steel nosecone which was going to weaken it too much.
So then it was option B. In QLD to register a Cobra kit car, some ICV's or something with rolled pans you're supposed to run some sort of pseudo bumper behind the bodywork made from 2" round or RHS tube, even exhaust tube is accepted which seems ridiculous, just so long as its wide enough to extend to the tyre area. So I decided to run with this option, I much preferred the challenge and coolness of having a stock bumper hidden amongst the front for the pulled over on the side of the road factor, but the RHS or round pipe option makes it a hell of a lot easier which suits me just fine. By rights, I don't specifically need a bumper at all as there's no frontal impact regs for this era, or I could argue that the nosecone forms the 'bumper' as well, but I like the thought of having something there just in case I give it a tap or have any questions about the glass front once its on the road.
So, it was down to business. First up was to refit the standard CL irons, mainly because I have about 5 pairs of these and only set of VG irons left:

Then I cut away the bumper mounting ears and slotted the remaining stumps of the bumper bracket to recess in the 50x50 RHS tube. I was originally going to pie cut the RHS in the middle and angle it back as per a stock bumper profile, but it fitted fine without doing that so didn't bother:

That all went super smooth so I'll tack them in place tomorrow, cut the ends to make it about 1800mm wide, take them off to give them a full weld, with probably an extra gusset or two on the back for good luck:


So there you go, ugly as fark but it won't be visible from the outside and I'll be flat blacking everything on the front face of the guards and rad support panel anyway. Only minimal metal now needs to be trimmed from the nosecone to make it slip over, so it'll do just perfect for both that part and keeping it sweet for rego.
have fun
Simo
hemi4bbl- Posts : 33
Join date : 2010-08-06
Re: The John Holmes CL Valiant Pornovan Project
![]() by 0488TINTER 26/6/2011, 5:17 pm
by 0488TINTER 26/6/2011, 5:17 pm
Where's it upto now?
0488TINTER- Posts : 47
Join date : 2011-06-25
Re: The John Holmes CL Valiant Pornovan Project
![]() by wizard2 27/6/2011, 12:28 am
by wizard2 27/6/2011, 12:28 am
wizard2- Posts : 199
Join date : 2010-06-18
Age : 63
Location : muswellbrook
Re: The John Holmes CL Valiant Pornovan Project
![]() by 0488TINTER 27/6/2011, 5:51 am
by 0488TINTER 27/6/2011, 5:51 am
0488TINTER- Posts : 47
Join date : 2011-06-25
0488TINTER- Posts : 47
Join date : 2011-06-25
Re: The John Holmes CL Valiant Pornovan Project
![]() by vanner065 1/7/2011, 7:50 pm
by vanner065 1/7/2011, 7:50 pm
It is the greatest build i have seen of a van, so many photos and so many laughs, well dome Simo.

vanner065- Admin
- Posts : 1603
Join date : 2008-08-13
Re: The John Holmes CL Valiant Pornovan Project
![]() by 308mate 3/7/2011, 12:37 pm
by 308mate 3/7/2011, 12:37 pm

308mate- Posts : 12
Join date : 2009-05-21
Location : Wootton, North Coast NSW
Re: The John Holmes CL Valiant Pornovan Project
![]() by mazdragon 3/7/2011, 1:21 pm
by mazdragon 3/7/2011, 1:21 pm
mazdragon- Posts : 1973
Join date : 2008-08-14
Location : somewhere on the planet in my den

Rusty62TransAm- Posts : 191
Join date : 2008-09-18
Age : 61
Location : www.majesticvanners.com -
Page 7 of 8 • 1, 2, 3, 4, 5, 6, 7, 8 ![]()
» New member
» My xy van project
» MY NEW WB PROJECT
» Holden vans with John Goss style roof spoilers
» Squaw in the modern age of Vanning
» Fire Truck roof spoiler
» CAR SHOW AT BOWRAL NSW
» A van only magazine needed? Are you interested?
» October 19th
» Fathers Day Hot Rod Show 2014
» hsv front to a HJ
» REGO PLATES